EQ mastering requires more finesse than most producers realize. Listeners can typically detect EQ changes above 3dB, but even a 1dB adjustment packs enough punch to improve your mix significantly. This subtle balance sets professional productions apart from amateur ones.
Our extensive testing of eq mastering approaches over the last several years has shown that the best techniques involve gentle subtractive moves instead of dramatic boosts. At the time I work on a master eq session, attenuating specific frequencies yields cleaner results – like reducing lows from the side image up to about 80Hz and dipping around 250Hz.
Sound fundamentals are straightforward – human hearing ranges from 20Hz to 20,000Hz, but mastering eq plugins require complex application. Most home recordings struggle with the 250-500Hz range, yet many producers overlook this vital area as they create their mastering eq cheat sheet.
Mastering just needs dedicated study and practice. The technical nature of this delicate process means that one small adjustment could throw your entire track off course. But here’s the good news – you’ll make better decisions with proper monitoring around 73-76 dB SPL, where your ears hear most accurately across the frequency spectrum. In this piece, we’ll look at producer’s common EQ mastering mistakes and their solutions.
Understanding EQ in Mastering: What It Really Does
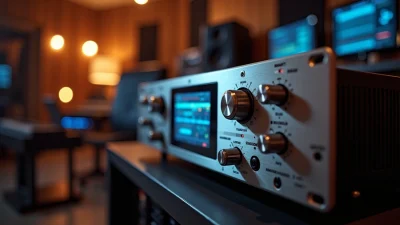
Image Source: Pro Audio Design
EQ mastering works differently from applying effects to individual instruments because it processes the entire stereo mix as one unit. This creates a need for a completely different mindset and approach compared to what producers usually use in mixing sessions.
What Is EQ Mastering and Why It’s Different from Mixing
EQ mastering gives you one last chance to shape the tonal balance of a completed mix. The biggest difference shows up in scale. Mixing lets you work on individual instruments one at a time, with substantial adjustments of 3-5dB to shape specific sounds. Mastering EQ affects the entire mix at once and needs much gentler tweaks, usually around 1dB or less. These small changes impact everything from vocals to drums to ambient textures and create ripples throughout the sonic landscape. Your mastering EQ acts like a “swiss knife” to finalize a track without changing its core character.
The Role of EQ in the Final Sound
Mastering EQ has two main goals: bringing back clarity and achieving the right tonal balance that works well on playback systems of all types. The process fixes frequency imbalances that could make a mix sound muddy on some systems or thin on others. It also catches problematic frequency buildups that slipped through during mixing. Beyond just fixing issues, mastering EQ adds artistic character—maybe a touch of warmth in the low mids or some extra “air” in the highs. The process helps tracks on an album sound cohesive, even when they were recorded or mixed in different conditions.
Why Subtlety Matters in Mastering EQ
Subtle changes make all the difference in mastering EQ. A completed mix responds strongly even to tiny adjustments. Most mastering engineers stick to a golden rule: they avoid making any changes greater than 3dB during mastering. They usually work within the 0.25dB to 2dB range when boosting or cutting frequencies. Experience has taught them that small tweaks can transform a flat-sounding mix into one that breathes with clarity and depth. Many top engineers will send mixes back to be fixed if they need more than 2-3dB of EQ. The logic is simple: mastering should make the mix’s strengths shine without making the processing obvious.
The technical side of mastering EQ sets it apart too. While mixing often uses zero-latency processing for live adjustments, mastering typically uses linear phase EQ for cleaner frequency adjustments. This works because mastering can handle higher latency, allowing for more sophisticated processing that keeps frequency relationships intact. Even with the best mastering EQ, you need knowledge, restraint, and a clear vision of how it fits into the mastering chain.
The 4 Core EQ Approaches Every Producer Should Know
Professional mastering engineers use EQ as four distinct tools. Each tool serves a specific purpose. My extensive testing in professional studios shows these core strategies will help you tackle almost any mastering situation. Let’s take a closer look at each approach and see how they change the way you handle frequency in your masters.
1. Remove Nasty Frequencies (Surgical EQ)
Surgical EQ targets and removes problematic frequencies with narrow-band cuts (high Q values). This technique cleans up your audio before any tonal shaping starts. The main goal is to eliminate unwanted resonances—frequencies that stick out unnaturally and hurt the overall sound quality.
You can apply surgical EQ most effectively through these techniques:
Sweep technique: Boost a narrow band and slowly sweep until you find a particularly unpleasant sound, then cut it by 2-10dB
Frequency chart: Find “red word” descriptors in your sound (boxiness, muddiness) and target their corresponding frequencies
Vowel technique: Use whispered vowel sounds to spot problematic areas
Surgical EQ should come before compression in your mastering chain. On top of that, it works best when you hear a specific problem first, then fine-tune into it—not just randomly notching frequencies. Note that each surgical cut has its price, potentially “blurring” the imaging of mix elements in the soundstage.
2. Improve Pleasing Elements (Tonal EQ)
Tonal EQ comes after surgical EQ and compression to improve what already sounds good in your mix. To name just one example, a vocal might sound clear but need more presence—a 2dB boost around 6kHz might highlight that aggression.
Tonal EQ uses broader Q settings and gentle boosts that sound more musical and natural. Prominent mastering engineers prefer analog-modeling EQs that add pleasing harmonic character. Tonal EQ doesn’t introduce new elements—it magnifies what’s already in the recording.
The main difference from surgical EQ lies in purpose: surgical EQ fixes problems, while tonal EQ builds on strengths. Shelving filters play a crucial role in tonal EQ—you might use a high shelf to add air to acoustic guitars or vocals.
3. Create Space Between Instruments (Range Allocation)
Range allocation gives specific frequency ranges to different instruments, which creates separation and clarity in your final master. This technique stops multiple elements from fighting in the same frequency zones, which reduces masking and muddiness.
The basic idea is simple: find where each important element sounds best, then make sure other instruments don’t interfere. If your kick drum sounds perfect with emphasis at 60Hz, mark it as “Kick: 60Hz” and cut that frequency in your bass. Then, if your bass shines at 120Hz, cut that frequency from your kick.
This technique needs careful planning—not just reacting to problems. Put your focus on the most important mix elements (vocals, lead instruments, rhythm section) instead of trying to allocate ranges for every sound. You might want to allocate frequencies for group busses rather than individual instruments in complex arrangements.
4. Make Creative Changes (Character EQ)
EQ sometimes serves a purely creative purpose—dramatically changing sounds instead of just fixing or improving them. You might filter out both high and low frequencies from a vocal section to create a telephone effect.
Character EQ often uses more extreme settings than other approaches. You could use dramatic high-pass and low-pass filters to isolate a specific frequency band, or apply unusual boosts that wouldn’t normally be “correct” but create an interesting timbral quality.
Most mastering involves subtle adjustments, but character EQ opens doors for artistic expression and sound design. This approach really shines when applied to specific sections of a track, which creates variation and interest throughout the song.
These four distinct EQ approaches give you a complete framework to handle any frequency challenge in your masters. Knowing exactly which approach fits each situation helps you make confident, targeted decisions that improve your music rather than just changing it.
8 Common EQ Mistakes Producers Make
Even skilled producers make critical EQ mistakes during mastering that hurt their otherwise excellent work. These errors stay hidden until the final product reaches listeners—usually when fixing them is no longer possible.
1. Boosting Without Intent
Producers often reach for boost knobs when elements need emphasis. This approach creates boomy lows and harsh highs. The biggest problem occurs when a track fails to cut through despite EQ boosting – frequency masking from competing elements is the culprit. You should cut frequencies from other tracks first. This surgical approach creates space without the harshness of excessive boosting.
2. EQing in Solo Mode
The solo button might be your worst enemy in mastering. Decisions made in isolation sound perfect yet fall apart in context. A track sculpted to perfection in solo often disappears, overwhelms other elements, or sounds wrong in the full mix. Note that nobody will ever listen to that track alone, so why should you?
3. Overusing High-Pass Filters
High-pass filters rank among the most overused tools, especially with beginners. Aggressive application removes low-end drive from instruments and makes mids and highs sound unnatural. Setting an HPF below 100Hz works well to clean out unwanted rumble in vocals.
4. Ignoring Phase Issues
Standard EQs delay different frequencies by varying amounts. This creates phase smearing that affects how frequencies combine. These problems are systemic when:
Recording drum kits with multiple microphones
Using stereo miking techniques for instruments
Implementing parallel processing tracks
5. Using EQ to Fix Bad Recordings
Equalizers can work wonders but won’t save poorly recorded tracks. You should assess your recording quality honestly before extensive processing. Poor captures won’t transform into professional quality no matter how much you process them. Re-recording or sample replacement offers better alternatives for substandard tracks.
6. Not Using Reference Tracks
References are vital sonic targets before touching a single EQ knob. Working without them leaves you directionless. Match your reference’s perceived loudness to your mix. This prevents the psychoacoustic illusion that louder music has richer low-end and clearer highs.
7. Over-EQing the Master Bus
Restraint is key on the master bus. You shouldn’t need more than 1-2dB or at most 3dB when adjusting frequencies. Major improvements after substantial changes point to problems in individual tracks. Most EQ work should happen before the master bus.
8. Forgetting to Mix in Mono
Mono mixing reveals frequency imbalances and phase issues that stereo can mask. All instruments compete for the same center space in mono, which exposes frequency conflicts immediately. This limitation pushes you to use proper EQ, compression, and volume balancing instead of relying on panning to separate elements.
Mastering EQ Plugins That Passed the 2026 Studio Test
The results are in from rigorous studio testing in 2026. Four mastering EQ plugins stood above the rest, and each brings something special to different mastering scenarios.
FabFilter Pro-Q 3: Best for Precision
FabFilter Pro-Q 3 continues to set industry standards with its versatility and precision. Its accessible interface supports up to 24 bands with flexible filter types and surgical Q settings. The dynamic mode lets bands react to incoming signals—a perfect feature to get expansion during mastering. Users can view spectrum analyzers on multiple plugin instances at once to spot masking issues between tracks, something no other competitor offers. Pro-Q 3 shines with its zero latency, natural phase, and linear phase options.
Ozone EQ: Integrated Mastering Workflow
Ozone EQ distinguishes itself as a complete mastering environment rather than just a standalone tool. The module helps isolate stems within mixed files and regulates internal balance. A single slider replaces complex parallel routing and gain-staging to boost density and detail. Users navigate easily through filtering, pinning, and zooming features.
SplitEQ: Transient vs Tonal Control
SplitEQ changes the mastering game by breaking down signals into separate transient and tonal components. This fresh approach creates new possibilities in EQ application and solves previously impossible problems. Its tilt shelving and flexible slopes work better than conventional EQs to fix tonal issues that would typically need complete remix sessions.
GSat+ and Fresh Air: Free Tools That Work
GSat+ and Fresh Air show that great mastering doesn’t need expensive plugins. GSat+ delivers advanced saturation with multiple character types (clean, warm, crisp, classic) and precise monitoring options. Fresh Air builds on vintage exciter technology to add brilliance and shimmer without harshness using two simple controls: Mid Air and High Air.
Mastering EQ Cheat Sheet: Frequency Zones and Fixes
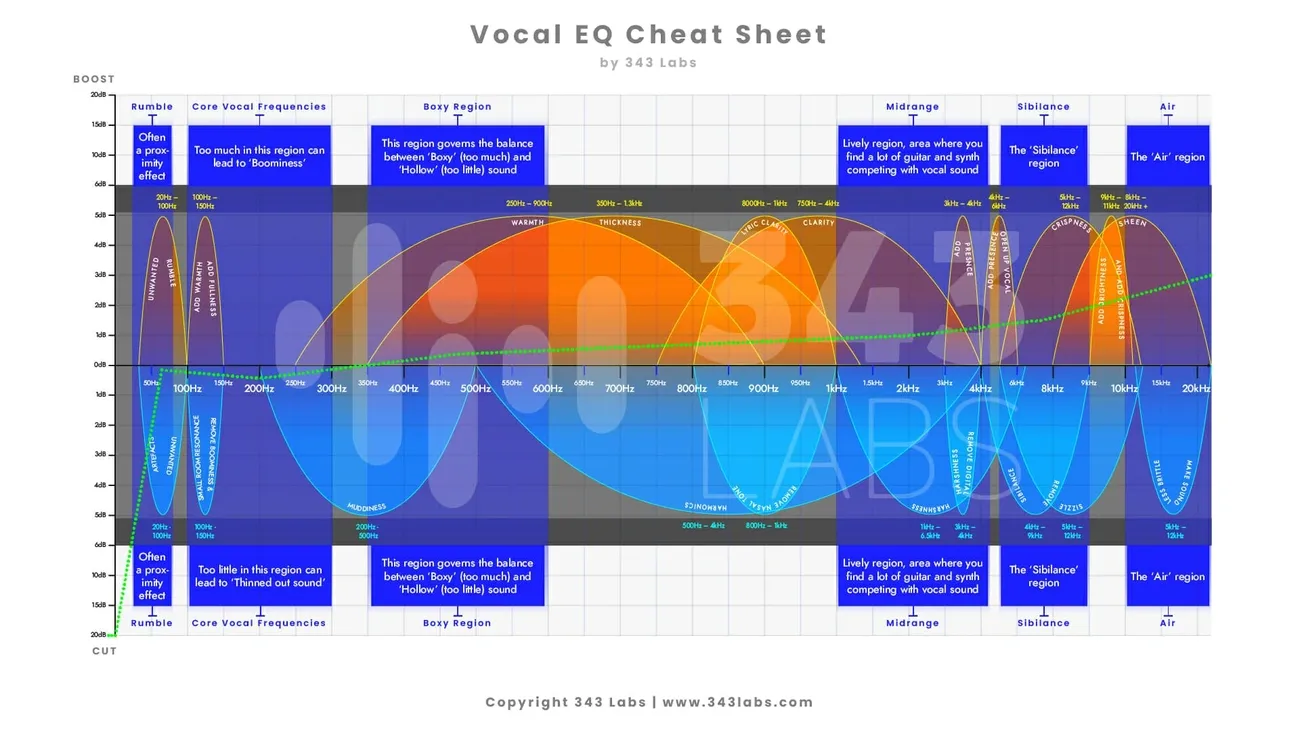
Image Source: 343 Labs
Frequency manipulation is the life-blood of effective mastering. Your final mix improves when you understand specific frequency zones and make targeted corrections without compromising its character.
Sub-Bass (20–60Hz): Tighten with Low Shelf
People feel sub-bass frequencies more than they hear them as they create physical impact rather than audible tones. A gentle low-shelf filter (around -1dB at 40Hz) tames excessive sub frequencies while preserving their essential character. The low end becomes cleaner when you high-pass at 20Hz with a relaxed 12dB/oct slope to eliminate inaudible rumble. You should avoid boosting sub frequencies during mastering unless you have substantial headroom and good reasons.
Low Mids (200–500Hz): Cut for Clarity
Muddiness and boxiness often lurk in the 250-500Hz range across many instruments. A small 1dB cut centered around 500Hz with moderate Q setting can clear up this wooden, muddy frequency zone. Most mastering engineers get substantially cleaner results by attenuating rather than boosting this region. This area becomes problematic when dozens of tracks compete in the same frequency space.
Mids (600Hz–2kHz): Watch for Boxiness
This range holds vital information for vocal presence and instrument clarity. The mix’s overall energy and life depends on how well you manage the 1-2kHz area. A subtle boost (no more than 1-2dB) here adds energy without creating thinness. Be careful though—this frequency zone turns brassy and harsh quickly when overemphasized.
Highs (8kHz+): Add Air with Shelves, Not Boosts
Shelving EQs work better than bell curves when dealing with frequencies above 8kHz. Air equalizers that magnify frequencies above 15kHz bring brightness without harshness. Bell boosts often create sharp, fatiguing results in comparison. A high shelf at 10-12kHz works better than aggressive bell curves when adding presence. This approach brings out cymbal sizzle and vocal air without introducing harshness when applied subtly (1-3dB maximum).
Conclusion
Becoming skilled at EQ ended up being about subtle tweaks and intention rather than dramatic changes. My years of testing and studio experience show that small moves of 1-2dB make the biggest difference in professional-sounding masters. So, knowing when to cut rather than boost frequencies sets apart amateur work from professional results.
The four core EQ approaches—surgical, tonal, range allocation, and character—give you a complete framework to tackle any frequency challenge. Each has its purpose, from removing problematic frequencies to enhancing pleasing elements. Your specific situation determines which approach will lead to more targeted, confident decisions.
Many producers still make common mistakes like boosting without intent, EQing in solo mode, or making excessive adjustments to the master bus. It also doesn’t help when you ignore phase issues or try to fix fundamentally flawed recordings with EQ alone. These mistakes show why mastering needs both technical knowledge and restraint.
The frequency cheat sheet works as your roadmap through the spectrum—especially when you have that troublesome 250-500Hz zone where muddiness often lurks. Cleaning up the low mids might seem boring compared to adding exciting high-end sparkle, but it creates the foundation for truly professional sound.
Modern plugins give you incredible precision and flexibility for mastering. In spite of that, even the best tools need proper application. FabFilter Pro-Q 3, Ozone EQ, SplitEQ, and free options like GSat+ and Fresh Air passed my thorough testing, but you still just need a trained ear and disciplined approach.
After analyzing hundreds of masters in a variety of genres, I firmly believe that mastering EQ remains both art and science. The technical aspects matter, of course, but developing your ear through careful listening and comparison against reference tracks matters even more. Start with subtle adjustments, trust your instincts—sometimes the best EQ move is the one you don’t make.