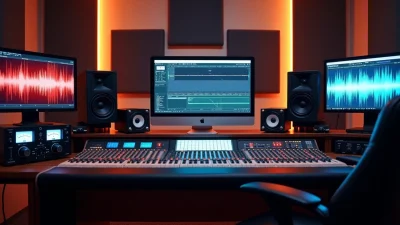
These days, finding real music producer tips that actually level up your sound is almost impossible. You can grind through endless YouTube videos, but the pros keep their true mastering secrets locked away.
My years of collecting production wisdom from industry veterans have taught me something crucial – mastering remains poorly understood by many producers. Most tips and tricks you’ll find focus on mixing and skip mastering completely. Your music’s clarity and resonance on every platform depends on proper mastering techniques.
Technical mastering knowledge can revolutionize your tracks, whatever your skill level. Most streaming services normalize audio between -11 and -16 LUFS, with -14 LUFS being the common standard. This unified loudness measurement system (LUFS – Loudness Units Full Scale) ensures consistent playback on listening platforms of all types.
These 11 mastering tips will lift your music production to professional standards. I’m ready to share the producing techniques that engineers typically keep secret, from EQ fundamentals to metadata handling.
Mastering Is Not Mixing
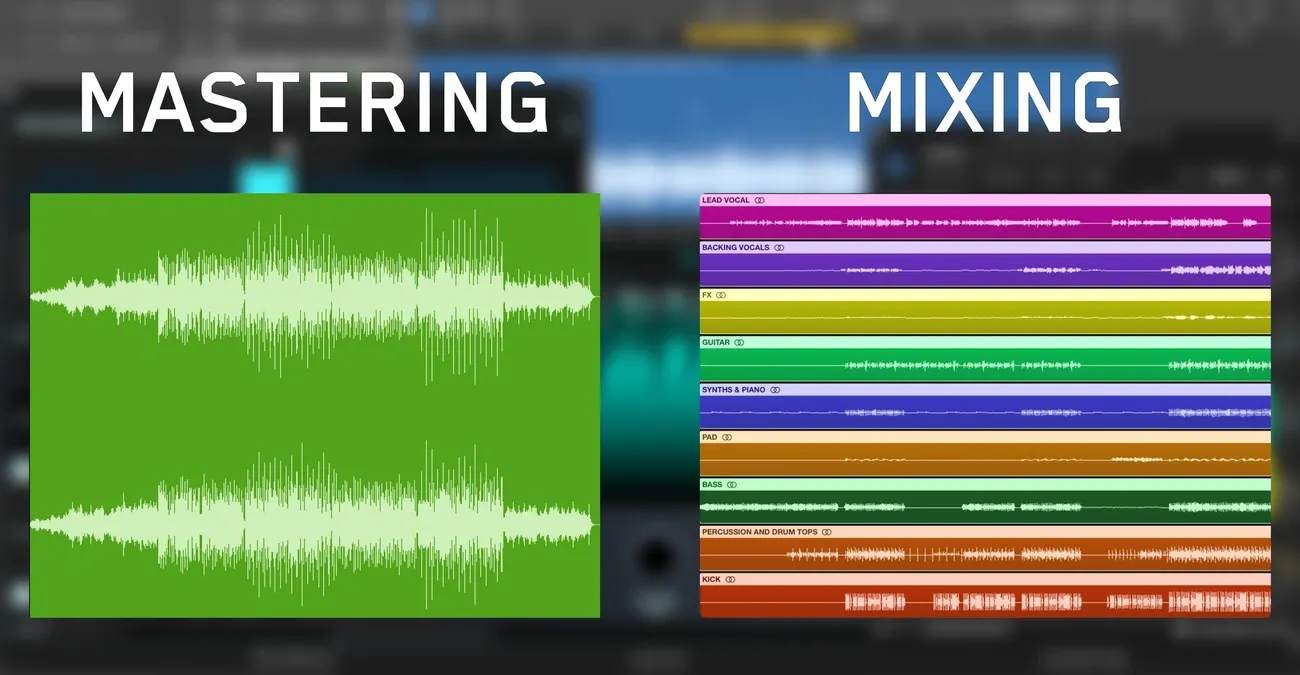
Image Source: Mastering The Mix
Many new producers mix up mixing and mastering processes. These two stages of music production need different skills, approaches, and ways of thinking.
Key differences between mixing and mastering
Mixing engineers deal with multi-track sessions that have separate instruments and vocals. They balance levels, handle panning, and shape the tones. I can control every element and make creative choices about parts and arrangements during this time. The mastering engineers, on the other hand, work with just the final stereo file and can’t touch individual components.
The basic purpose is different too. A mix creates a balanced blend that shows the artist’s vision. Mastering gets that vision ready to be played on different platforms and systems. On top of that, mixing lets you be creative and explore, while mastering needs technical excellence and must follow industry standards.
The tools serve different purposes as well. You can make big changes to individual tracks in mixing, but mastering only needs small tweaks—usually EQ changes around 1 dB up or down. Mastering also brings everything together through light compression and stereo enhancement while making sure the volume suits the platform.
Why this difference matters
Professional results need clear lines between mixing and mastering. One expert says it well: “The line between mixing and mastering should never be blurred”. Your music won’t reach its full potential if you try to do both at once.
Problems pop up when producers blur these stages:
They become too careful with mixing because they worry about the final master
Mastering gets heavy-handed trying to “fix” mix issues
Technical stuff gets in the way of creativity
Albums lose their consistency
Each process works best when kept separate. Great mixes tell emotional stories, and good mastering makes sure everyone hears that story.
How to change your mindset
Good mastering isn’t about big sonic changes – it’s about subtle improvements and quality checks. Mastering engineers provide a balanced, objective view. They work fast and catch any errors.
Here’s how to think differently:
Think of mixing like cooking ingredients and mastering like plating the dish
Start mastering with fresh ears, without the emotional baggage from mixing
Compare your track to pro releases in your genre instead of just trying to make it “sound better”
Remember that mastering makes good mixes shine but can’t fix basic mixing problems
Listen to mastered songs on different speakers and notice the subtle qualities that make professional masters stand out. Your ears will learn to spot mixing and mastering decisions, which will make you better at both.
Use EQ to Fix, Not to Enhance
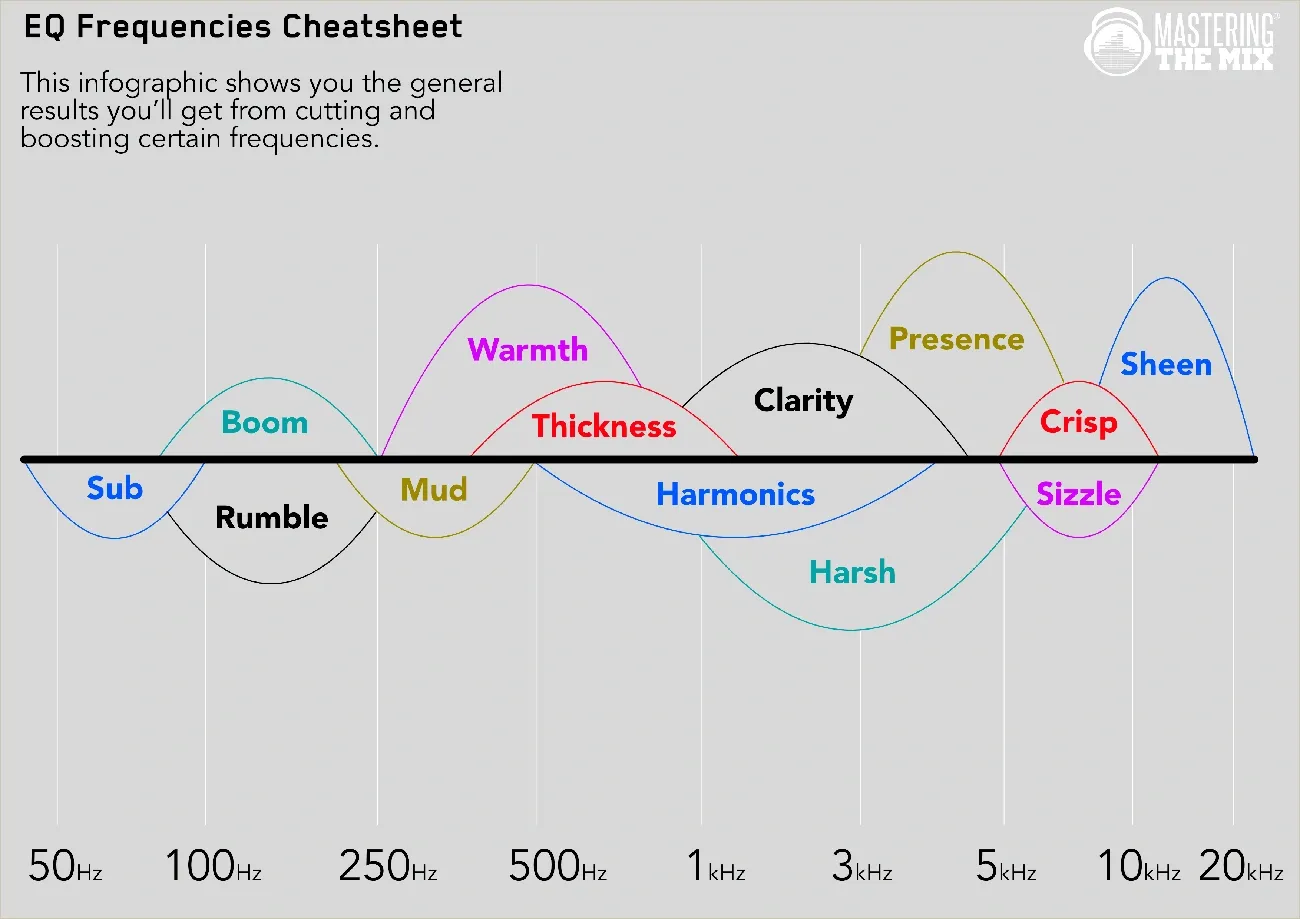
Image Source: Mastering The Mix
Many producers treat mastering EQ like mixing EQ, which is a mistake. The main goal of EQ in mastering is to restore clarity and achieve tonal balance that serves the music—not to reshape it dramatically.
EQ for correction vs enhancement
Professional mastering engineers know the difference between corrective and enhancement EQ. Corrective EQ fixes specific problems through precise adjustments to problematic frequencies. This approach relies on subtractive techniques to remove unwanted elements while keeping the mix’s integrity intact.
You should use enhancement EQ with extreme caution. It’s best to make wide, gentle boosts (with a wide Q value) to “sweeten” the track without creating artifacts. The logic is straightforward: if something sounds good, don’t risk damaging it by trying to make it “better.”
Here’s a useful way to look at it: subtractive EQ creates more room for transparent processing while keeping the original mix’s fidelity. Mastering follows a simple medical principle: “First, do no harm”.
Common EQ mistakes in mastering
Beginners often make the mistake of applying EQ before they properly listen to the music. They tend to boost frequencies when they should cut instead. Here are other common mistakes:
Using aggressive EQ (more than 2-3 dB) when subtle tweaks would be enough
Trying to “fix” poorly recorded material that needs a remix
Making overly bright masters that sound exciting at first but become tiring quickly
Ignoring the midrange while focusing only on lows and highs
Adding too much subwoofer energy that most systems can’t reproduce
A big problem is creating a “smiley EQ curve” by boosting lows and highs—this usually happens because of poor monitoring setups.
Subtle EQ moves that work
Small changes make a big difference in mastering. EQ adjustments usually stay around 1 dB or less on specific frequency ranges. These tiny changes can transform an entire mix.
Here’s what works:
Use high-pass filters carefully (around 20Hz) to remove inaudible rumble without affecting the music
Try a gentle 1dB cut around 500Hz to clear mud while keeping warmth
Use A/B gain-matched listening comparisons to assess subtle changes
Fix boomy or muddy mixes with a wide cut in the 150-250Hz range
Deal with harshness using narrow cuts between 3-5kHz instead of reducing overall brightness
Low-end issues are common problems. Gentle high-pass filtering combined with subtle shelf cuts works better than dramatic EQ changes.
Mastering EQ helps your mix sound better on all playback systems—it’s not about making dramatic sonic changes.
Compression Should Be Transparent
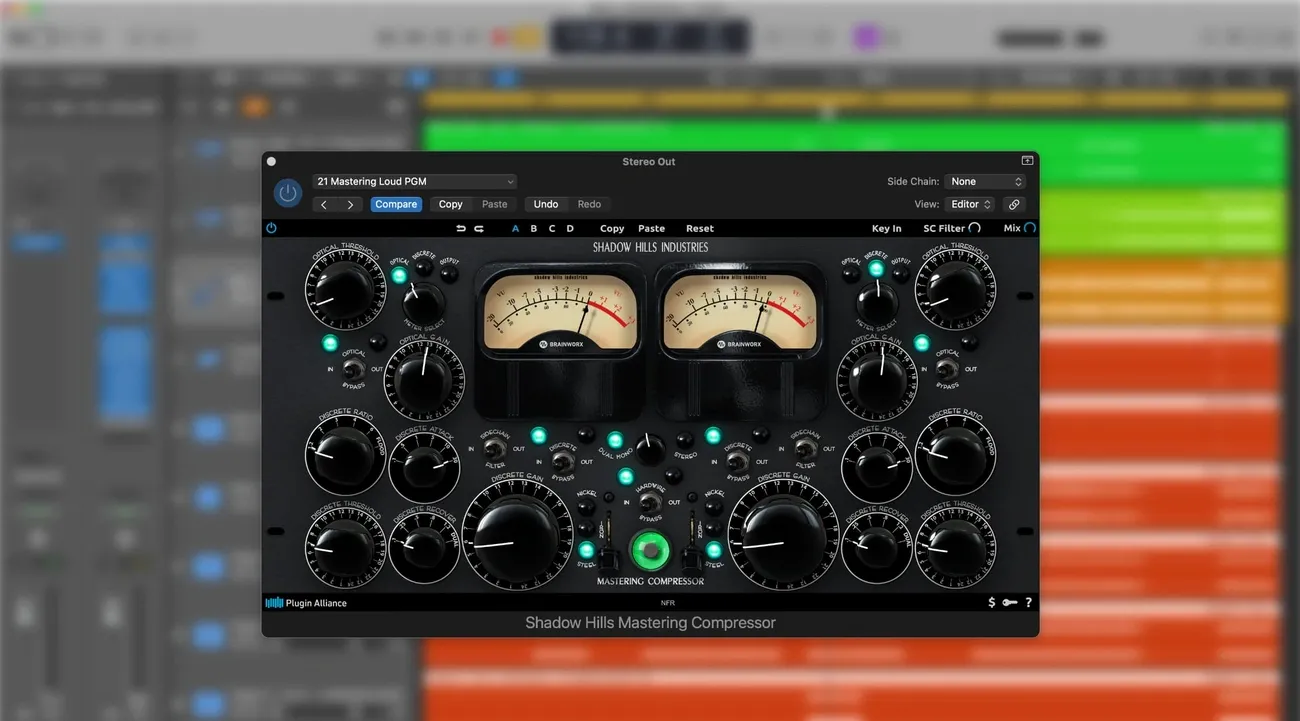
Image Source: Mastering The Mix
Transparent compression is the life-blood technique professional mastering engineers rely on, yet many producers struggle to implement it properly. Mastering compression should control dynamics without drawing attention to itself, unlike its mixing counterpart.
What transparent compression means
The art of transparent compression lets you control a track’s dynamics without changing its tone, feel, or musicality. Your goal during mastering isn’t to reshape individual sounds – you want to bring cohesion and consistency to the whole mix. Well-executed transparent compression preserves your audio’s transient character. Listeners won’t consciously detect these subtle adjustments.
This approach is different from mixing compression. Your processing gets magnified since you’re applying compression to the entire approved stereo mix in mastering. Subtlety becomes vital—your compressor should quietly work in the background. This helps preserve tonal integrity while providing precise dynamic control.
How to set attack and release
You need appropriate attack and release times to achieve transparent compression:
The attack time should start with a moderate setting (20-50ms). This allows transients to pass through untouched and preserves your mix’s punch and energy. Your track’s energy can get flattened by faster attack times (below 5ms). Mastering professionals avoid very fast attack times.
Release times deserve careful attention. Release times should stay above 50ms during mastering to prevent low-frequency distortion. Mastering professionals suggest finding the sweet spot by starting with a medium release. They gradually make it faster until the compressor sounds too aggressive, then back off slightly.
Your ratio should be gentle—somewhere between 1.2:1 and 3:1 usually does the job. Higher ratios might over-process your audio. Lower ratios (1.1-1.3:1) often create more transparent results.
Avoiding pumping and squashing
A master can quickly lose its energy and excitement through over-compression. Here’s how to dodge this common issue:
Listen for audible “pumping” or “breathing” where volume swells unnaturally as the compressor reacts
Your waveform shouldn’t look like a rectangular block – it needs natural peaks and valleys
The loudest moments should only show 2-3dB of gain reduction
Serial compression gives you an excellent way to maintain transparency. You can start with a fast, higher-ratio compressor that catches only the highest peaks. Follow this with a slower, lower-ratio compressor for gentle overall control.
Sidechain filtering helps prevent low frequencies from triggering excessive compression. Cutting these frequencies in the internal sidechain helps maintain dynamics while keeping your low-frequency content intact.
Limiters Are Not Just for Loudness
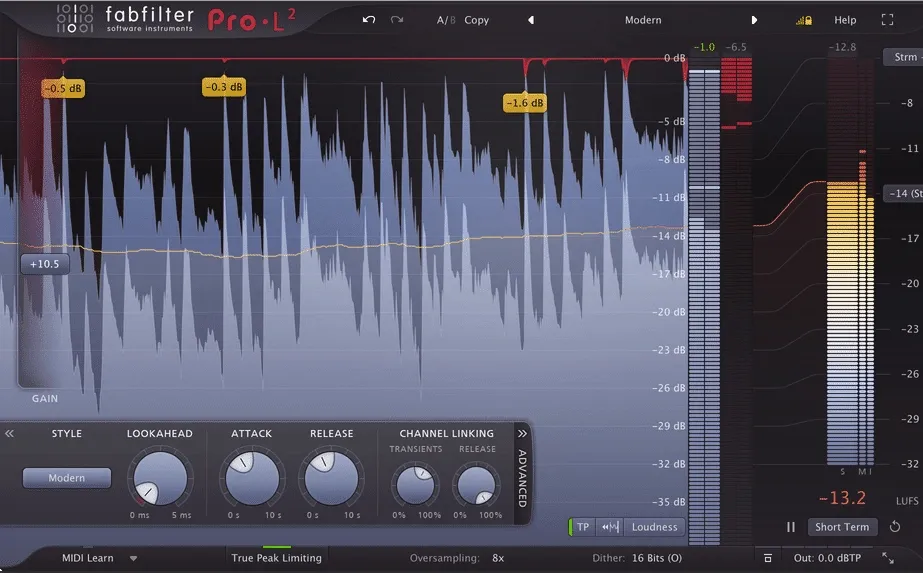
Image Source: Sage Audio
Most people see limiters as simple tools that just make things louder. But professional producers know these powerful processors can do much more throughout the production process.
Creative uses of limiters
Limiters do more than just work on the master bus. They shine at several unexpected tasks. A limiter on a drum bus helps control peaks while keeping the sound energetic. My experience shows limiters work great on:
Individual kick drums that need consistent, powerful impacts without losing character
Vocal tracks to catch those surprise peaks that could mess up your mix
Group busses to stop things from getting out of hand when multiple tracks play together
Sound design experiments to find interesting artifacts while keeping levels in check
Limiters are so versatile because they act as “safety nets” during production and can shape your tone creatively. You protect both your ears and speakers from sudden volume spikes by putting a limiter on your master bus right from the start.
Limiter settings for punch
Getting punchy, energetic limiting comes down to three key settings:
The threshold/gain comes first – this decides how hard the limiter works. This setting determines when brick wall compression kicks in. Moderate gain reduction usually gives you punchier results than extreme settings.
Next comes the release time – this needs careful adjustment. Too fast and you get distortion, too slow creates unwanted pumping. Slightly faster release times keep that transient energy in percussion-heavy content. Many modern limiters now include smart release modes that adjust to your audio automatically.
The output ceiling (usually set between -0.3dB and -0.8dB) sets your audio’s maximum level. This keeps your tracks from clipping while staying competitive in loudness.
Advanced limiters often include transient preservation features that help maintain attack characteristics even during heavy processing. These features can really boost your punch.
Avoiding clipping
The relationship between clipping and limiting plays a significant role in clean masters. These processes both stop signals from going over a threshold, but they work in different ways.
Limiters use very fast compression to reduce peaks cleanly, though they might dull transients sometimes. Clippers cut peaks right away, keeping more transient energy but adding distortion.
Here’s what works best:
Keep your limiter’s ceiling between -0.3dB and -0.8dB to avoid digital clipping, especially when you’re exporting for streaming platforms
A combination approach often works best – subtle clipping followed by limiting usually gives you the perfect mix of energy and cleanness
Compare your processed signal with the original to make sure you haven’t lost important sonic characteristics
Note that proper limiting starts with good gain staging earlier in your production chain. Clean limiting results come from setting the right levels throughout your mix.
Stereo Imaging Can Make or Break a Track
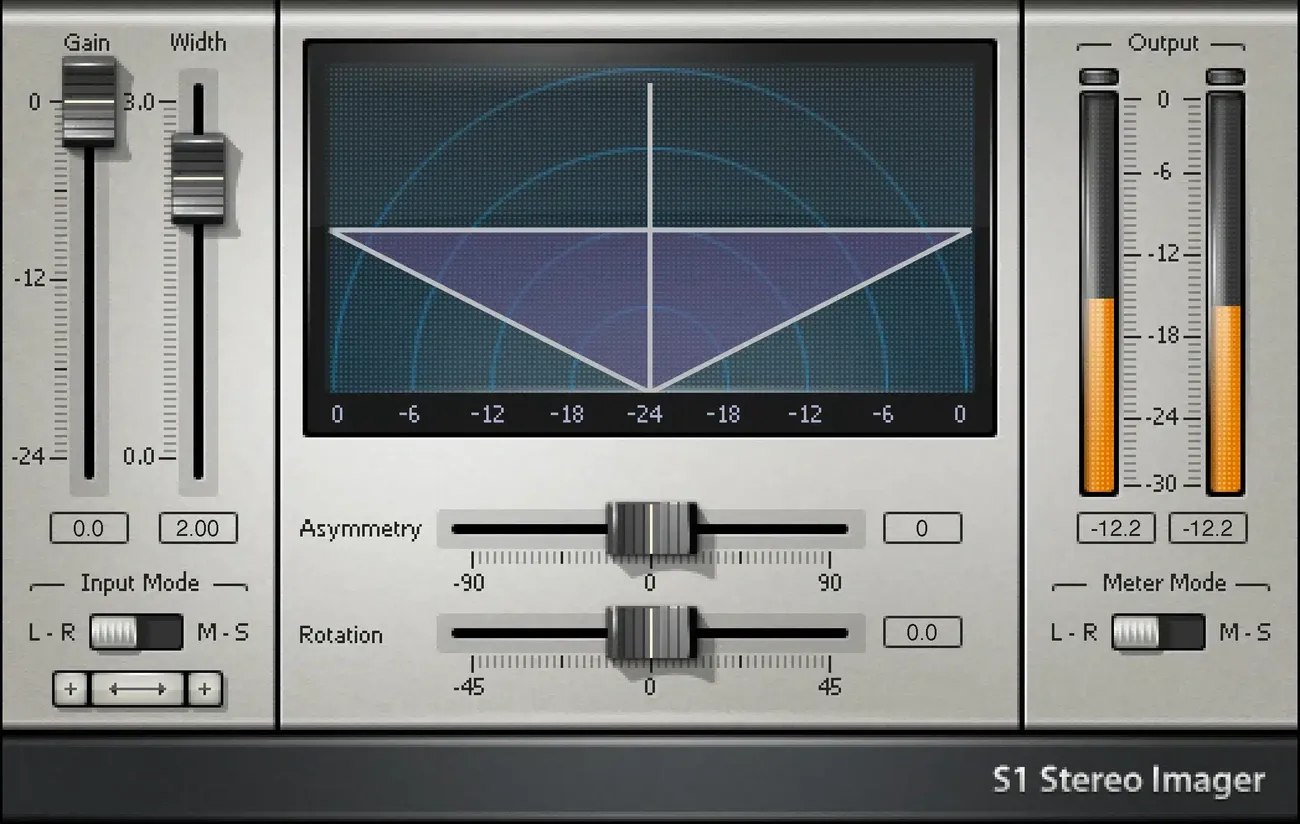
Image Source: Online Mixing and Mastering Services
Stereo imaging is the secret weapon in mastering that sets professional releases apart from amateur tracks. Sound placement in the stereo field creates a sonic landscape that can either engage listeners or make them feel disconnected from your music.
What is stereo imaging
Stereo imaging positions sounds within the stereo field to create a sense of location, width, and depth in your mix. The spatial arrangement between left and right channels gives each element its own space in terms of both frequency and position. A well-laid-out stereo image will give a clear separation that lets listeners hear each instrument distinctly.
Your track’s stereo width determines how “wide” or “narrow” the soundstage feels. Tracks with the right stereo width sound full and immersive. They pull listeners in naturally. Poor width management makes tracks sound cluttered or too narrow, and they lack energy.
Tools for stereo width
Top engineers use several specialized tools to shape the stereo field:
Mid/Side Processing: This powerful technique lets you work with the center (mid) and sides of a stereo image separately. You get precise control over spatial characteristics.
Stereo Enhancer Plugins: Tools like iZotope Ozone Imager and Waves S1 Stereo Imager alter phase, delay, or frequency relationships between channels.
Mid/Side EQ: You can equalize the center and sides independently. This lets you boost higher frequencies on the sides for air while keeping the low end focused in the middle.
Haas Effect: A subtle delay applied to one channel creates width, but you need to be careful with phase issues.
All the same, many mastering engineers prefer mid-side compression or limiting to expand stereo width naturally. This approach compresses the mid image and keeps the side image mostly untouched.
Avoiding phase issues
Phase problems pose the biggest risk when you boost stereo width. Phase cancelation can make frequencies disappear from your mix, especially in mono. Here’s how to protect your productions:
Bass and kick drums should stay centered for clarity and mono compatibility. A high-pass filter on the side channel helps make low frequencies mono.
You should check your mix in mono regularly during mastering to spot elements that vanish or get weaker. This step makes sure your track sounds good on any system.
Stereo wideners need careful handling. The temptation to maximize width is strong, but too much stereo enhancement can make the center lose focus and create phase problems.
Use Dynamic Range Meters
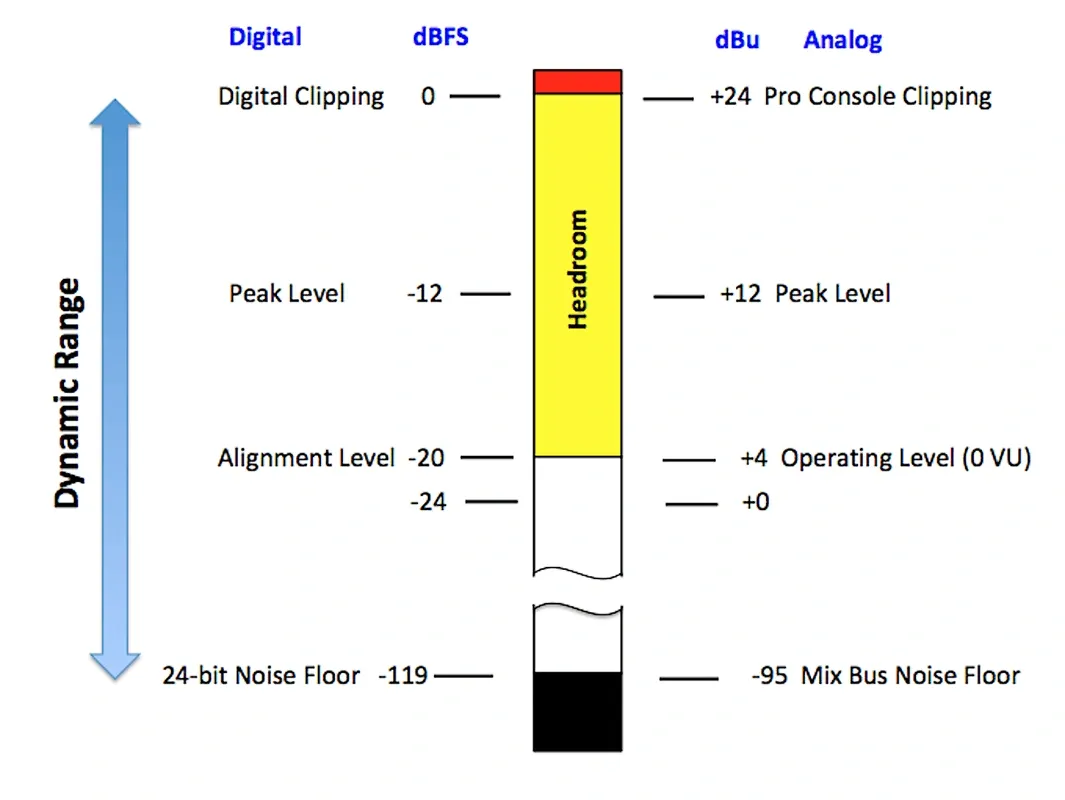
Image Source: Fiveable
Dynamic range meters can make the difference between amateur and professional productions. You just need to know how to use them properly. These tools are a great way to get tips for creating balanced, engaging tracks.
What is dynamic range
Dynamic range measures the difference between the softest and loudest parts of an audio signal in decibels (dB). Think of it as the contrast between whisper-quiet verses and thunderous choruses that creates musical tension and release. This measurement works for both individual tracks and complete mixes.
The human ear can detect approximately 90 dB of dynamic range. This range starts from soft whispers at around 30 dB and goes up to the threshold of pain at about 120 dB. Digital audio systems are nowhere near their limits—24-bit audio can theoretically handle 144 dB of dynamic range.
How to measure it
Professional producers rely on several metering tools to see dynamic range:
Peak meters: Keep audio from clipping by monitoring peaks below specific thresholds
RMS meters: Show the perceived loudness instead of just transient peaks
LUFS meters: Track integrated loudness based on streaming platform standards
Dynamic range meters: Show the relationship between short-term loudness and peak levels
These meters give you visual feedback—green shows healthy dynamics, orange means be careful, and red warns of potential problems. You should look for oscilloscope displays that reveal waveform movement. They show you right away how dynamic your music really is.
Why it matters in modern production
Your music’s dynamic range shapes how listeners experience it. Tracks with more dynamic range sound natural and emotionally expressive. Music that’s too compressed with low dynamic range will tire listeners quickly.
Here’s a practical tip: keep your dynamic range PSR (peak-to-short-term-loudness ratio) above 8. This helps preserve your music’s vitality. Remember that different genres work better with different approaches—classical music needs wider dynamics than electronic dance music.
Streaming services now use loudness normalization, so the “loudness wars” don’t matter anymore. This makes proper dynamics even more significant for professional-sounding productions.
Mastering for Streaming vs Vinyl
Image Source: Mastering The Mix
Vinyl and streaming platforms create mastering challenges that catch even seasoned producers off guard. Your music’s quality depends on how well you can adapt your sound to these different formats.
Key differences in mastering formats
Vinyl has physical limits that streaming doesn’t need to deal with. The record’s grooves set boundaries that affect your mastering choices. We learned that louder signals need wider grooves, which cuts down the amount of music that fits on each side.
Sound quality works best when you keep each side under 20 minutes to stay clear of inner-groove distortion. Digital masters don’t face these time limits but they need to work with complex loudness rules across platforms.
The biggest difference lies in dynamic range. Vinyl naturally keeps dynamics better than heavily compressed digital masters, so too much limiting actually hurts vinyl releases. Vinyl sounds best with minimal limiting and natural dynamics, while digital masters can handle more aggressive processing.
LUFS targets for streaming
Streaming platforms use loudness normalization to keep all content at similar volumes. Each platform has its own LUFS targets:
Spotify: -14 LUFS (with optional user settings at -11 and -19)
Apple Music: -16 LUFS
YouTube: -14 LUFS
Amazon Music and Tidal: -14 LUFS
Deezer: -15 LUFS
Making your masters louder than these targets just means your music gets turned down during playback. Streaming services won’t boost quiet masters beyond their peak ceiling, which can make extreme dynamics a problem.
True peak levels should stay below -1 dBTP to avoid clipping during lossy encoding processes.
Low-end handling for vinyl
Bass frequencies need special care on vinyl. Low-end content below 40Hz can make a turntile’s needle swing too much and skip. Bass information below 100Hz should be centered to keep tracking stable.
Bass material that’s out of phase creates real trouble on vinyl by pulling the cutting head in opposite directions. Everything under 300Hz should stay in phase to prevent groove collapse and skipping.
High frequencies above 20kHz can make cutting heads overheat and distort. The RIAA curve helps solve these issues by fitting more music while making playback sound better.
Metadata Matters More Than You Think

Image Source: Symphonic Blog
A secret weapon lies behind every great master: metadata. Most producers pay attention to sound quality but overlook this significant digital information that determines if their music gets heard—and paid for.
What metadata is in mastering
Your audio files contain embedded information called metadata that identifies and describes your music. This digital version of liner notes includes vital fields like artist name, song title, producer credits, songwriter information, genre, release date, copyright ownership, and unique identifiers like ISRC codes. These digital fingerprints help streaming platforms catalog and identify your tracks in the vast ocean of available music.
Why it’s importance for royalties
Your income depends on proper metadata. Research shows approximately 25% of music publishing revenue never reaches the right owners because of incorrect metadata. Streaming platforms and performing rights organizations need accurate data embedded in your music to track usage and distribute payments. Proper metadata will give accurate credit attribution and help distribute royalties from every stream, play, and license.
How to embed metadata
To properly add metadata to your masters:
Ask your mastering engineer to embed it in MP3 versions
Use specialized tools like Mp3Tag, Tagr, or ProTools when exporting
Complete all fields when uploading to distribution platforms
Use Reference Tracks Across Devices

Image Source: Audified
A producer’s true mastery shows up when their studio work plays on ground systems. Professional producers know that reference tracks serve as vital measures to evaluate how music translates to different listening environments.
Why device testing matters
Each playback system comes with its own character—frequency response, stereo width, and dynamic handling. Your studio monitors might tell one story, while consumer speakers or earbuds tell another. Testing your audio on multiple systems will give you universal compatibility that adapts to various listening conditions.
How to test on multiple systems
Set up a reliable testing routine:
Begin with professional studio monitors to get neutral evaluation
Switch to consumer speakers that reflect everyday listening
Take it to car stereos where most people enjoy their music
Use headphones and earbuds to check personal listening
Test on smartphone or laptop speakers last
Match levels between your master and reference tracks to compare fairly. You can use a standalone application or DAW.
What to listen for
Your ears should catch these key elements:
Balance and EQ: Bass and treble should stay consistent on all systems
Stereo image: Stereo elements need to hold up on different speakers
Dynamics: Watch out for compression artifacts that become obvious
Distortion: Look for collateral damage that only shows up on certain systems
Take notes when problems show up on multiple systems—you’ll need to fix these right away.
Mastering Is a Mindset
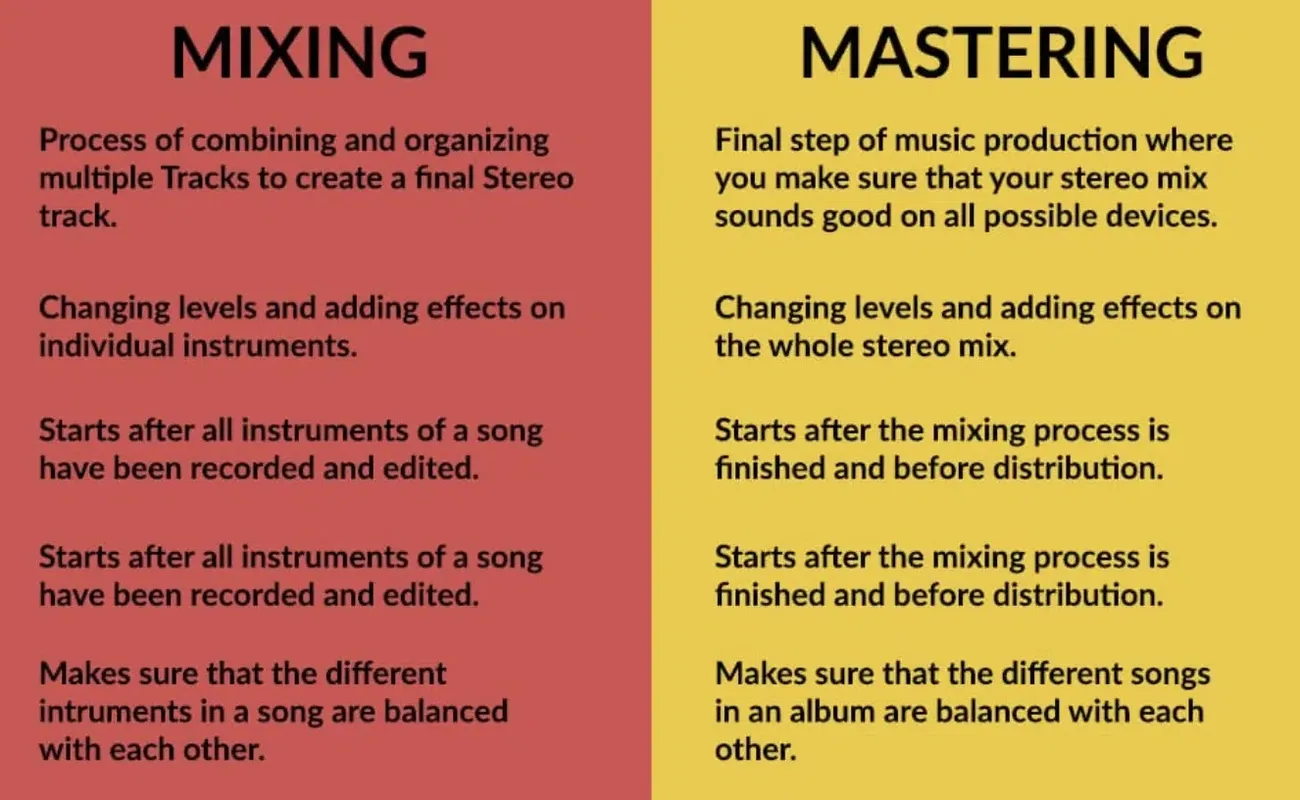
Image Source: Unison Audio
The right mindset sets the foundation for successful mastering—a viewpoint many beginner producers tend to overlook. You just need emotional detachment and an objective ear to master your own material, but many creators find this challenging.
Why objectivity is key
Your emotional connection to the mix can cloud judgment. This makes it hard to spot problems with level, EQ, and dynamics. Mastering engineers provide that emotional distance and see the music from a “big picture” viewpoint. The goal isn’t to impose your taste—it’s about enhancing what’s already there so it works well on platforms of all types.
How to stay unbiased
Taking regular breaks between mixing and mastering helps maintain objectivity. Let your mix rest for at least a day before mastering to get a fresh viewpoint. On top of that, it helps to test your work on different playback systems outside your studio.
For optimal results:
Close your eyes while making processing decisions to eliminate visual influence
Use LUFS metering for level matching to avoid loudness bias
Create distance by mastering in a different environment than where you mixed
Tips for mastering your own music
People say you should never master your own tracks, but sometimes you have no choice. Here are some music production tips that can help:
Ask trusted peers for feedback—fresh ears will catch problems you might miss. Use reference tracks to measure your work against professional releases. Keep the processing minimal and let the music guide you rather than your ego.
Use AI Tools as Learning Aids, Not Crutches
Image Source: Production Music Live
AI mastering tools provide powerful shortcuts, but their real value comes from what they teach. Professional engineers know these technologies work best as educational platforms that complement human judgment rather than replace it.
Best AI mastering tools
Several outstanding options deserve attention in this space. iZotope Ozone comes with AI-assisted functions that analyze tracks and suggest starting points while giving users complete control over every parameter. This setup lets producers learn by examining the modules and settings the AI recommends.
CloudBounce produces impressive results with solid mixes. Many professionals use it as a reference master during production. LANDR gives instant mastering with customizable options and quick feedback that helps train your ear.
The lineup includes other notable tools. MasteringBOX stands out for its simplicity and affordability. Grammy Award-winning engineers created eMastered, while Masterchannel analyzes thousands of professionally mastered tracks with AI.
Here’s the best tip about AI mastering for music producers: These tools help you understand which processing types benefit your music. You can experiment and see how subtle changes affect the sound. Your mastering instincts will develop naturally as you analyze AI decisions instead of accepting them without question.
Comparison Table
|
Tip |
Key Purpose |
Main Challenges |
Best Practices |
|
Mastering Is Not Mixing |
Create final stereo mix ready for platform distribution |
Mixing and mastering roles get confused |
Keep EQ changes around 1 dB and focus on technical excellence rather than creative choices |
|
Use EQ to Fix, Not to Boost |
Bring back clarity and balance tonal elements |
Too much processing and excessive boosting |
Apply subtractive EQ with adjustments under 2-3 dB and focus on corrections rather than creativity |
|
Compression Should Be Transparent |
Handle dynamics without changing tone |
Pumping and squashing sounds become obvious |
Set ratios between 1.2:1 and 3:1 with gain reduction at 2-3dB and attack times above 20ms |
|
Limiters Are Not Just for Loudness |
Shape tone while protecting from peaks |
Keep punch while preventing clipping |
Set ceiling between -0.3dB and -0.8dB with moderate gain reduction and check transient preservation |
|
Stereo Imaging |
Add depth and width to the space |
Problems with phase cancelation |
Center your bass frequencies and check mono compatibility regularly without excessive widening |
|
Use Dynamic Range Meters |
Track the gap between quiet and loud parts |
Keep proper dynamics for streaming platforms |
PSR should stay above 8 and use different meter types |
|
Mastering for Streaming vs Vinyl |
Make it perfect for each playback format |
Each format needs different settings |
Aim for -14 LUFS in streaming with vinyl sides under 20 minutes and centered bass below 100Hz |
|
Metadata Matters |
Help tracks get identified and royalties paid |
Data fields missing or wrong |
Fill out all metadata fields with ISRC codes and verify before distribution |
|
Use Reference Tracks Across Devices |
Make sound consistent on all systems |
Systems sound different |
Check multiple systems with matched levels and test mono compatibility |
|
Mastering Is a Mindset |
Make decisions without bias |
Getting too attached to mixes |
Rest between mixing and mastering sessions and get feedback from others |
|
Use AI Tools as Learning Aids |
Learn from AI while you retain control |
Too much dependence on automation |
Study AI decisions and test settings as reference points only |