Getting the right LUFS for techno isn’t as straightforward as you might think. Spotify and Apple Music target around -14 LUFS for normalization, but here’s the reality: most commercial releases ignore this. In fact, pop singles are often mastered at -8 LUFS and carry the dense energy that listeners expect from club-ready tracks.
So what LUFS should you master to? Understanding integrated LUFS and target LUFS for mastering is significant for techno producers. LUFS mastering requires balancing streaming platform standards with genre expectations.
This piece will walk you through the optimal LUFS for mastering techno and how to measure it. You’ll learn the process to hit your loudness targets without sacrificing punch.
What is LUFS and Why It Matters for Techno
LUFS stands for Loudness Units Full Scale and represents the modern standard for measuring perceived loudness in audio production. Traditional metering methods measure electrical signal strength, but LUFS accounts for how our ear-brain system interprets loudness based on tonal balance.
Understanding LUFS Measurement
A K-weighting filter gets applied to incoming audio and begins the measurement process. This filter applies a 4 dB high-shelf above about 2 kHz and a 12dB/oct high pass filter at 100 Hz. Our natural sensitivity to different frequencies gets simulated by the weighting. Mid-range frequencies where our ears are most responsive get emphasized while the effect of extreme lows and highs gets reduced.
LUFS provides three distinct measurement types. The average loudness of an entire track from beginning to end gets calculated by Integrated LUFS. This serves as the main metric for what lufs should i master to when you prepare final deliverables. Short-term LUFS analyzes a three-second window of audio and proves useful for comparing different sections like verses against choruses. Momentary LUFS captures a 400-millisecond window and reveals instant loudness changes that might feel harsh to listeners.
Very quiet moments get prevented from dragging down overall readings by the gating mechanism. This makes LUFS measurements more accurate for understanding the listening experience rather than simple mathematical averages.
How LUFS Is Different from RMS and Peak Levels
RMS, or root mean square, measures the electrical power your audio signal creates over time. Producers aim between -18 dBFS and -14 dBFS when adjusting for RMS for mixing purposes. But RMS treats all frequencies the same and measures average signal level without accounting for how we perceive different frequency ranges.
Frequency weighting gets applied before measurement by LUFS and makes it truer to human hearing perception. Bass frequencies contribute less to perceived loudness than upper midrange frequencies. Two tracks measuring the same RMS values may have very different LUFS readings due to their frequency content and tonal balance.
Peak measurements show only the highest signal moment and suggest where clipping might occur. The analog level coming from digital-to-analog converters gets predicted by true peak readings through oversampling the audio. Neither peak nor RMS measurements reflect how loud a track feels to listeners, which is why integrated LUFS has become the standard for target LUFS for mastering on streaming platforms of all types.
Why Techno Needs Specific LUFS Targets
Club playback requirements and sustained energy delivery mean techno needs different loudness targets than other genres. Commercial techno masters around -8 to -6 LUFS, by a lot louder than streaming platform recommendations. This loudness maintains competitive energy levels in DJ sets where tracks play back-to-back.
LUFS readings get affected differently by the bass-heavy nature of techno than midrange-focused genres. K-weighting filters out low frequencies during measurement, so techno producers can push harder without LUFS readings reflecting the full bass weight. Understanding how frequency content affects perceived loudness becomes essential for lufs mastering in club-oriented genres for this purpose.
Audio gets normalized by streaming services, with Spotify targeting -14 LUFS and Apple Music at -16 LUFS. Platforms reduce output gain without applying additional compression when they normalize louder techno masters downward. The track retains its punch and dynamics while playing at reduced volume. This makes aggressive lufs for mastering choices viable even for streaming distribution.
Target LUFS for Mastering Techno Music
Most professional techno tracks master between -10 and -6 LUFS integrated. They push substantially beyond streaming platform recommendations. This range delivers the sustained energy and competitive loudness techno requires in club environments. Producers who want medium dynamics like house music find -12 LUFS works well. Harder techno styles benefit from pushing up to -7 LUFS.
Recommended LUFS Range for Techno
Commercial electronic releases show an average integrated loudness of -8.3 LUFS. The data reveals a range that spans from -11.3 LUFS at the quieter end to -6.2 LUFS at the loudest extreme. These numbers reflect actual industry practice rather than theoretical ideals.
Club-focused releases where streaming normalization doesn’t matter shift the priority entirely to perceived effect. LUFS becomes less relevant when DJs control gain staging through mixer channels effectively. What matters more is keeping true peaks controlled while you maximize the punch of your kicks and bass elements. Many producers who target vinyl or club-only releases ignore integrated LUFS and focus instead on dynamics and transient preservation completely.
The sweet spot between loudness and dynamics falls around -9 RMS typically. This equals approximately -11 LUFS. This level provides enough sonic energy for effect without squashing dynamics completely. Some mastering engineers push beyond this threshold and accept that streaming services will reduce their tracks by several LUFS.
Integrated LUFS vs Short-term LUFS
Integrated LUFS captures average loudness over your entire track duration. It serves as the main metric for final deliverables. Short-term LUFS analyzes three-second windows and reveals how different sections compare. Professional releases often show short-term peaks between -7 and -5 LUFS, even when integrated measurements sit lower.
Techno with consistent energy throughout will have integrated and peak short-term values that sit close together relatively. Tracks with dramatic breakdowns show wider gaps between these measurements. Keep your loudest moments at -10 LUFS short-term or below. This helps maintain punch without over-compression.
True Peak Settings for Techno Masters
Set your limiter ceiling to -1 dBTP minimum for all techno masters. This headroom accounts for inter-sample peaks that occur during digital-to-analog conversion and file encoding. Spotify recommends increasing headroom to -2 dBTP when you master louder than -14 LUFS integrated.
True peak meters predict actual analog levels through oversampling. You risk distortion on consumer playback systems and club sound systems without proper headroom built into their signal chains when you go above 0 dBTP.
Genre Comparison: Where Techno Sits
Electronic and EDM genres master louder than acoustic styles consistently. Jazz and classical tracks land between -14 and -12 LUFS typically. Rock and pop sit at -13 to -10 LUFS. Hip-hop pushes to -10 to -7 LUFS and places itself alongside techno in terms of loudness expectations.
This positioning reflects genre-specific production approaches. Bass-heavy electronic music can sustain higher loudness levels. K-weighting filters treat low frequencies during LUFS measurement in a way that allows this.
How to Measure LUFS for Your Techno Track
Accurate measurement starts with choosing the right tools. Several metering plugins handle LUFS and True Peak monitoring well, from free options to professional suites.
Best LUFS Metering Plugins
Youlean Loudness Meter offers both free and paid versions. It tracks LUFS, True Peak, and dynamic range with beginner-friendly visuals. The premium version adds offline file analysis by dropping audio files onto the plugin. iZotope Insight 2 provides LUFS, True Peak, and spectrum analysis in a customizable interface that suits professional workflows. Mastering The Mix LEVELS features color-coded alerts that help you identify issues quickly, with presets for Spotify, club systems and other delivery formats. Waves WLM Plus handles music, film and broadcast metering requirements with accuracy. FabFilter Pro-L2 combines limiting with built-in True Peak detection and offers eight limiting algorithms with measurement capabilities.
Each tool follows the ITU-R BS.1770-4 standard and ensures consistent measurements across platforms.
Setting Up Your LUFS Meter
Your metering plugin should go last on the master bus, after all limiters and effects. This positioning captures the final output signal instead of intermediate processing stages. Load the plugin and select a preset matching your distribution target if available. Choose club-specific settings if offered when your techno is aimed at clubs.
Click the readout displays to reset the meter before measurement begins. This clears previous data and starts fresh analysis.
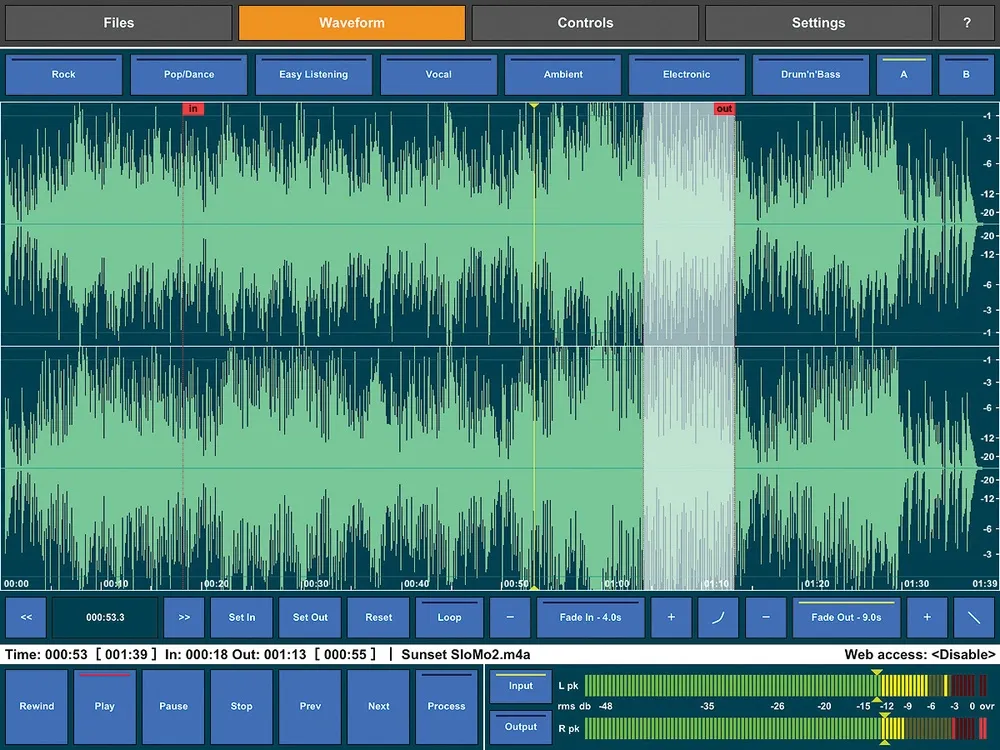
Reading Integrated LUFS Values
Play back your entire track from start to finish without stopping. The integrated loudness meter accumulates data during playback and calculates average perceived loudness. Short-term meters update every three seconds and show momentary fluctuations.
Check your integrated LUFS reading after playback completes. Calculate how many LUFS you sit above or below your target. You need about 2.5 LUFS more gain if you aimed for -8 LUFS but measured -10.5 LUFS. Increase your master limiter input gain by a bit more than this offset. The extra headroom accounts for how limiting affects the signal.
Checking True Peak Levels
True Peak measures inter-sample peaks that occur between digital sample points during analog conversion. Standard peak meters miss these values, which can exceed 0 dB even when sample peaks stay below the ceiling.
Monitor True Peak readings throughout your loudest sections. Streaming platforms recommend maximum levels of -1 dBTP, with some suggesting -2 dBTP for lossy codec compatibility. Lossy formats like MP3 and AAC can increase volume by about 1 dB during conversion.
Lower your limiter ceiling until warnings disappear when True Peak alerts appear. Focus on the track’s most energetic moments where kicks and bass hit hardest. Keeping peaks below -1 dBTP prevents distortion on consumer playback systems and maintains clarity during format conversion.
Step-by-Step Process to Set LUFS for Techno
Mastering techno to specific LUFS targets requires a systematic workflow that balances loudness with sonic integrity. This six-step process ensures consistent results across releases.
Step 1: Prepare Your Mix for Mastering
Check that your mix peaks between -6 and -3 dB before you apply any mastering processing. Reduce levels on individual tracks rather than lowering the master fader if peaks exceed -3 dB. This approach maintains proper gain staging throughout your signal chain.
Remove any limiter on your master channel. Send two versions if you rely on master effects: one with effects showing your intended sound and another clean for processing flexibility. Apply low-cut filtering to eliminate unwanted subsonic noise. Export at 24-bit resolution matching your project sample rate. Leave 2 to 8 bars of silence at the beginning and end. Skip normalization and dithering during export.
Step 2: Insert Your LUFS Meter
Place your metering plugin at the end of your master bus processing chain. This positioning captures the final output after all limiting and compression. Reset the meter displays to clear previous measurements before you start playback.
Step 3: Apply Limiting and Compression
Set your limiter output ceiling to -0.1 dB. Use transparent settings for compression: attack at 10 ms, release at 70 ms, ratio of 1.20:1 with zero makeup gain. Push the threshold down until the track begins pumping, then back off. Aim for 2 to 3 dB of gain reduction maximum.
Multiband compression works better than standard limiting for techno. Set higher ratios in the bass area while you reduce them through mid and high frequencies. Stage your compression with 2 to 3 dB reduction per processor when you use multiple units.
Step 4: Check Your Integrated LUFS
Play your track from start to finish without stopping. The integrated measurement accumulates throughout playback and calculates average perceived loudness. Note your integrated LUFS reading after completion.
Step 5: Adjust for Target Loudness
Calculate the difference between your current reading and target LUFS for mastering. Adjust your limiter threshold to increase or decrease loudness. Push the threshold down to raise integrated LUFS. Pull it up to reduce loudness.
Step 6: Verify True Peak Levels
Set your final limiter ceiling to -1.0 dBTP minimum. Use -0.3 to -1 dB True Peak headroom for streaming distribution. Monitor peaks throughout your loudest sections and ensure no True Peak warnings appear during playback.
Common LUFS Mistakes in Techno Production
Producers sabotage their techno masters through avoidable errors that compromise sonic quality. These patterns help maintain effect while hitting appropriate loudness targets when you understand them.
Pushing Too Loud and Losing Dynamics
Tracks slammed to -6 LUFS often sound lifeless despite measuring loud. Streaming platforms turn down excessive levels anyway. Spotify normalizes to -14 LUFS. Your over-compressed master gets reduced but retains the squashed dynamics created during limiting. So two tracks normalized to similar playback levels sound vastly different. A -6 LUFS master with 4 dB dynamic range sounds weaker than a -14 LUFS master preserving 10 dB of range. Focus on dynamics instead of chasing numbers.
Table of Contents
Ignoring True Peak Values
Inter-sample peaks cause distortion during MP3 and AAC encoding. Many producers ignore true peak meters and allow peaks above -1 dBTP. These overshoots create audible clipping during format conversion that wasn’t present in the WAV file. Leave at least -1 dB true peak headroom.
Mastering for the Wrong Platform
Club releases need different treatment than streaming deliverables. Mastering for Spotify sacrifices energy needed in DJ sets.
Over-Compressing the Low End
Bass frequencies consume headroom. Over-compressed subs dominate compressor movement and cause pumping throughout your mix. Professional techno uses less sub bass below 40 Hz than expected.
Conclusion
Right now, you have everything you need to master your techno tracks at professional loudness levels using LUFS for techno, without sacrificing the punch, groove, and dynamics that define the genre.
For most commercial techno releases, a target between -10 and -6 LUFS integrated is a solid benchmark, while keeping true peaks below -1 dBTP to avoid distortion on playback systems. However, understanding LUFS for techno goes far beyond simply hitting a number. The real objective is to preserve the energy, transients, and low-end weight that translate effectively on large club sound systems.
One of the biggest mistakes producers make is chasing loudness at the expense of impact. Over-limiting and excessive compression can flatten your track, removing the very punch that makes techno powerful. A well-balanced master using LUFS for techno should feel loud, but still breathe. Dynamics are what create movement, tension, and release on the dancefloor.
It’s also essential to adapt your mastering approach depending on the final destination. Club-oriented tracks often benefit from slightly more dynamic range and stronger transients, while streaming platforms like Spotify or Apple Music will normalize your track anyway. This means that pushing your master too hard offers no real advantage. Proper use of LUFS for techno ensures your track remains competitive without unnecessary degradation.
Accurate metering is key. Always rely on professional LUFS meters and analyze both short-term and integrated values. Pay close attention to your low-end, as techno relies heavily on a tight and controlled bass. Avoid over-compressing your kick and sub frequencies, as this can quickly lead to a muddy or lifeless mix. Clean EQ, subtle saturation, and controlled limiting will help you achieve a more polished result.
Another important aspect of LUFS for techno is consistency. Compare your track with reference tracks in the same style, not just in loudness but in perceived energy and clarity. Loudness alone does not define quality — balance does.
Finally, mastering is not a fixed formula but a process of refinement. Experiment with different limiter settings, transient shaping, and dynamic processing. Trust your ears as much as your meters. Over time, you will develop an instinct for what works best within the framework of LUFS for techno.
When done right, your masters will not only hit the right loudness targets but will also retain their punch, depth, and clarity. Whether your track is played in underground clubs, large festivals, or on streaming platforms, a strong understanding of LUFS for techno will ensure your music stands out with professional impact and sonic precision.