Your techno tracks live or die by their mastering chain selection. My years of experimentation have shown me that everyone hears things differently. The right signal chain makes all the difference between an amateur and professional sound, whether you plan to play your tracks in clubs or release them.
My extensive testing revealed how the mastering chain order substantially affects your final output. The perfect plugin sequence and combination enhances your track’s tone, balance, and overall appeal. Small EQ tweaks of just 1 to 3 dB can reshape the scene of your techno productions. Many producers tend to overprocess their tracks when subtle adjustments would be enough.
Let me share the exact mastering chain plugins that top techno producers use in 2025. You’ll see them arranged in the best order to work effectively. This workflow helps create professional-quality masters without spending too much, especially if you’ve tested your tracks extensively before release.
Step 1: Subtractive EQ with FabFilter Pro-Q 3
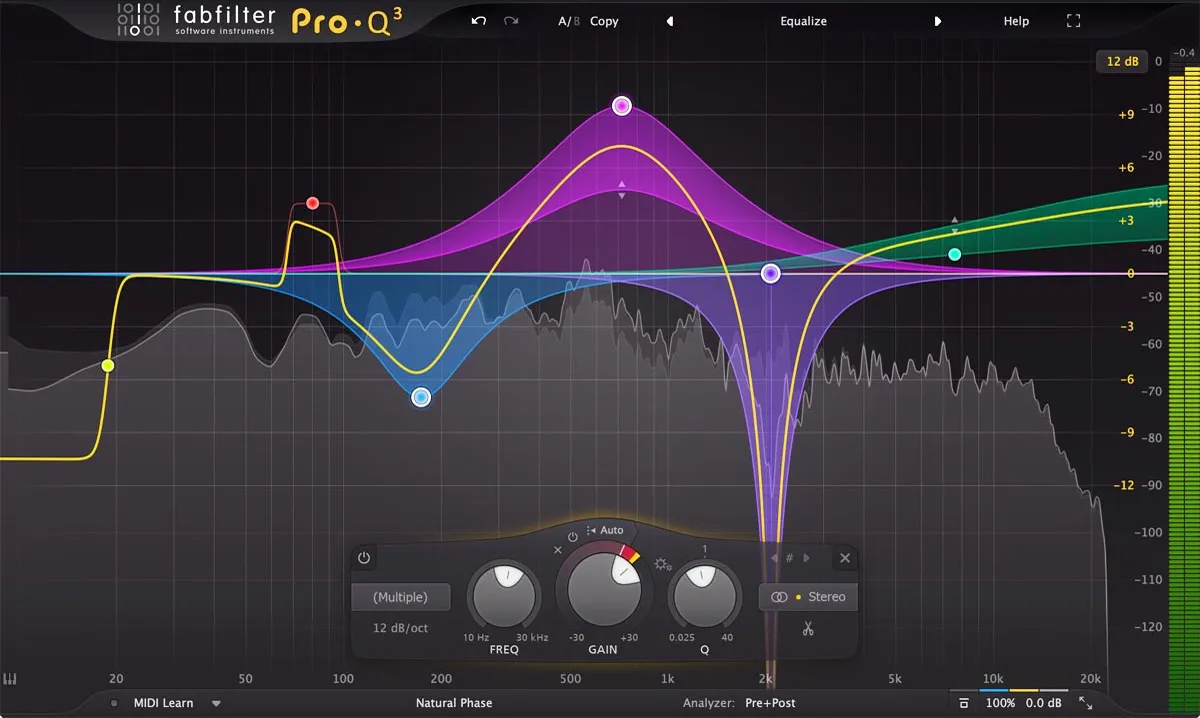
Image Source: FabFilter
FabFilter Pro-Q 3 is my first go-to tool in the mastering chain because of its surgical precision and visual feedback. Professional mastering starts with corrective equalization instead of enhancement. This sets the foundation for all the processing that follows.
Why EQ comes first in the mastering chain
EQ is the most important part of any mastering chain. Your original stage gives you the last chance to check and fix frequency content before adding dynamics processing or saturation. Many prominent mastering engineers live by one principle: amateurs boost, professionals cut. This approach will give a better headroom throughout your signal chain.
Subtractive EQ helps create space in your mix. You’ll get better results by removing competing frequencies from other elements rather than boosting a vocal to make it cut through. This approach prevents frequency masking in your techno tracks and leaves vital headroom for later processing stages.
Pro-Q 3’s visual analyzer spots problematic frequency buildups right away. Tiny adjustments between 0.25 to 0.5 dB can reshape the scene of a master. Your track should peak around -6 to -3 dBFS before any processing. This gives your plugins enough headroom to work without distortion.
Mid/Side processing for stereo control
Pro-Q 3’s most valuable feature for techno mastering is its mid/side capabilities. Mid/side processing lets you control center-panned elements (vocals, kick, bass) and wider stereo information (pads, reverbs, percussion) independently, unlike standard stereo EQ.
Mid/side EQ delivers more precision and transparency than regular stereo equalization. This separation gives you exceptional control over spatial characteristics in techno tracks without affecting mono compatibility.
These mid/side techniques work great for techno:
Center Focus: Gently cut mid-channel low-mids (200-500 Hz) to reduce muddiness while maintaining bass impact
Stereo Expansion: Apply a subtle high-shelf boost (10-12 kHz) to the side channel for spatial enhancement
Vocal Clarity: Boost the mid channel around 3-5 kHz to bring vocals forward without affecting stereo elements
Mid/side EQ is powerful but needs careful handling. Wrong moves can drastically change your mix or create phase issues that hurt stereo imaging. Minimal adjustments work best for techno mastering—stay below 4 dB with wider Q values.
Low-end cleanup and headroom optimization
Professional techno tracks need clean, focused low-end. A high-pass filter between 20-40 Hz removes inaudible subsonics that eat up headroom without adding to the listening experience.
Gentle shelving sounds more musical than steep filters for techno’s low-end. Taking out excessive low-end energy from the side channels keeps your bass centered and powerful. This technique maintains clean sub frequencies and frees up headroom for other elements.
On top of that, it’s better to cut low frequencies than boost highs to avoid harshness. When dealing with muddy mixes, focus on cutting around 200-500 Hz instead of adding brightness. Pro-Q 3’s auto-gain feature helps you hear tonal changes without volume differences.
Note that mastering needs restraint. Small EQ moves between 1-2 dB usually give the most professional results, even for techno’s aggressive sound. Your goal is to improve rather than fix—if you’re making big cuts or boosts, you might want to revisit your mix.
Step 2: De-essing and Resonance Control with Soothe2
EQ helps clean up the frequency spectrum, and the next vital step in my mastering chain deals with problem resonances. Oeksound’s Soothe2 has become my go-to tool to control harsh frequencies that regular EQ doesn’t handle well.
Dynamic suppression of harsh frequencies
Soothe2 works as a dynamic resonance suppressor, which sets it apart from traditional processors. Regular EQ makes static cuts, but Soothe2 spots problem resonances and reduces them automatically. The processing kicks in only where and when needed without touching nearby frequency areas.
This approach works great with techno tracks because resonance issues change throughout the song. Regular EQ cuts would lower those frequencies even when they sound fine. Soothe2 lowers harsh frequencies only when they build up. This keeps the energy and punch that techno needs.
The processor spots frequency buildups and reduces gain immediately based on what it hears. Your techno tracks keep their edge while problem frequencies get tamed right when they pop up. Soothe2 does in seconds what would take forever with regular EQ notching.
Depth control sets how much processing happens. Higher settings cut more resonance, while lower settings are gentler. Subtle settings between 0.5-1dB work best for mastering. Small tweaks can smooth out harshness by a lot without losing your techno track’s character.
Soothe2 comes with hard and soft modes to tackle different resonance problems. Hard mode tackles bigger issues, while soft mode fixes subtle resonance problems. Soft mode works better on full mixes because it keeps the punch that techno’s drums need.
Oversampling and sharpness settings for transparency
Sharpness in Soothe2 works like Q values in regular EQ. Higher sharpness creates deeper, narrower cuts to target specific frequencies. Lower sharpness settings often sound more natural for mastering.
The quality section lets you pick oversampling options that change how the plugin processes audio. Higher oversampling rates give better quality but use more CPU power. Transparency matters in mastering, so I turn on oversampling. Problem frequencies can create aliasing distortion when they go above the maximum frequency that the sampling rate allows.
Oversampling helps avoid harsh-sounding aliasing distortion. This matters with techno’s bright, punchy material. Some engineers turn off oversampling for certain tasks because it might affect transient detail.
Soothe2 does more than just de-essing. It handles:
Smoothing out harsh high-frequency content
Controlling resonant mid-range frequencies
Balancing tonal inconsistencies throughout a track
Creating space between competing elements
Mid/side processing is a great feature for techno masters. You can process center and side information separately to make room for vocals or leads while keeping the stereo field intact. The external sidechain option helps create precise frequency relationships between elements during mastering.
Soothe2 has changed the game compared to old-school de-essers or dynamic EQs, bringing precision that wasn’t possible before in mastering chains. The way it analyzes and responds to spectral content makes it essential for creating polished techno tracks.
Step 3: Harmonic Saturation with FabFilter Saturn 2
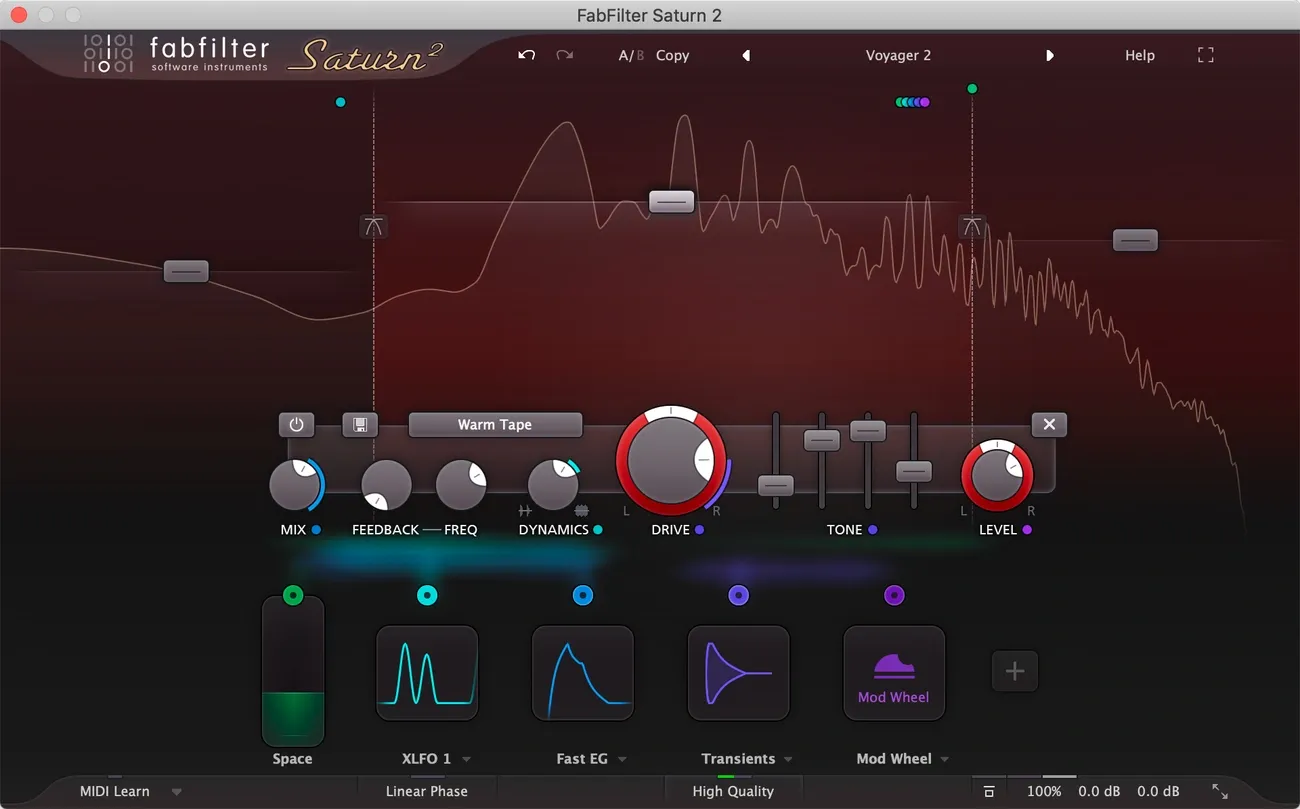
Image Source: FabFilter
EQ and resonance control lead naturally to harmonic content, which is a vital part of my mastering chain. FabFilter Saturn 2 fills this role perfectly by adding warmth and character that digital productions often miss.
Multi-band saturation for tonal balance
Saturn 2’s multiband capabilities make it stand out. You can use up to 6 independent frequency bands for targeted saturation. This lets you apply different distortion types and drive amounts to specific frequency ranges, which helps maintain balance while adding character. Single-band saturation affects your entire mix without discrimination, but multiband processing keeps clarity while enhancing specific areas.
My experience with techno tracks shows that isolating frequency bands creates room for both power and detail. The user-friendly display makes creating bands simple and works as an up-to-the-minute frequency analyzer that shows the outgoing signal. This visual feedback helps a lot when setting crossover points between bands.
The plugin’s adjustable crossover slopes (6, 12, 24, and 48 dB/octave) give you plenty of flexibility when separating frequency bands. I use gentler slopes for low/mid transitions and steeper ones for higher frequencies in techno masters. Each band has controls for drive, mix, feedback, dynamics, tone, and level that let you shape your saturation profile with precision.
Tube vs tape modes for techno textures
Saturn 2 comes with 28 distortion styles, but knowing which ones work best for techno makes all the difference. The tube emulations range from subtle mastering-grade options to more aggressive “broken tube” sounds. Clean tube models work great on low frequencies to add warmth without mud, while mid-range can handle more character.
Tape emulations bring a different flavor, from subtle warming to extreme saturation. These models excel at binding elements together, which works great for techno’s layered percussion and synth elements. Tape saturation adds a subtle compression effect and slight high-frequency softening that gives tracks an authentic, finished quality.
Saturn 2 has amp models based on famous American and British amps, plus transformer distortion styles. These options open up creative possibilities for specific frequency bands. You might add transformer saturation to mid-highs for presence or amp distortion to upper mids for aggression.
The “subtle” distortion modes work best for mastering applications. Using these with oversampling (the “Superb” 32x mode) will give a transparent sound while adding that finished quality to techno productions. The dynamics control shapes how saturation responds to your material and affects transients differently from sustained elements.
Saturation adds perceived loudness without increasing peak levels because it brings up quieter parts while maintaining peaks. This helps before limiting and often adds an extra dB of apparent volume without more peak compression.
Step 4: Analog Warmth with Softube Tape
The next step makes a good master great by adding analog warmth. Softube Tape brings real tape machine qualities into digital productions. This creates the cohesive sound that many modern techno tracks need.
Subtle stereo widening and crosstalk
Softube Tape’s Crosstalk control shapes the stereo field with genuine analog character. It lets the left and right channels blend naturally, just like physical tape machines. The result is more organic than digital stereo tools. The center-panned elements like kicks, bass, and vocals get stronger while the stereo field expands.
Your techno masters will sound best with crosstalk set between 40-50%. These settings give you a wider stereo image without phase problems. The mono compatibility stays intact – crucial for club systems. You get more dimension in your mix without moving elements around. The centered low-end stays powerful and wider elements get room to breathe.
Choosing tape speed and type for genre-specific tone
Tape speed selection shapes your techno production’s character. The 30 ips and 15 ips settings keep things neutral, perfect for mastering. You’ll get clean transients with just a touch of tape saturation.
Lower speeds add more color to your sound. The 7.5 ips and slower speeds bring warmer tones. Speeds like 3¾ and 1⅞ ips create rich harmonics that blend beautifully with techno’s electronic textures.
The Type selection offers three distinct flavors:
Type A: Based on a Swiss precision machine known for linearity
Type B: Transformer-based with enhanced low-end presence
Type C: British machine with vintage characteristics and improved punch
Type B stands out as the top choice for techno masters. It adds subtle color and handles processing better than other options. Type C works great if your productions need more low-end impact. Proper HF Trim adjustments help balance any high-frequency changes from tape speed. Softube Tape gives you that special analog “glue” that makes techno productions sound professional.
Step 5: Final Loudness and Limiting with Pro-L2 and Oxford Limiter
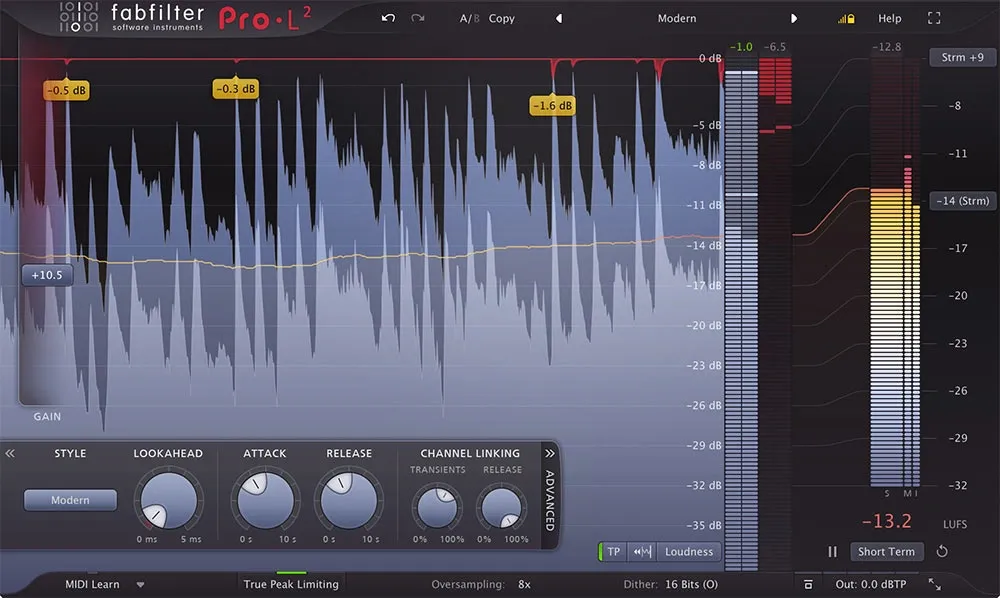
Image Source: Plugin Boutique
My mastering chain’s final stage uses two powerful limiters that maximize loudness without quality loss. This combination helps me overcome the shortcomings you’d face with just one limiter, especially for aggressive techno productions.
Dual limiter technique for clean loudness
FabFilter Pro-L 2 and Oxford Limiter work together to create balanced loudness. The setup lets the first limiter handle the heavy lifting while the second one controls the final ceiling. This approach splits the workload so each plugin works more efficiently. Techno tracks processed this way keep their significant transient details even at competitive loudness levels. The Oxford Limiter’s “Enhance” function gives an extra boost to the perceived loudness without pushing true peak levels higher – a perfect match for techno’s dynamic punch.
True peak limiting and intersample peak control
Many producers don’t deal very well with inter-sample peaks, which can cause problems. These peaks show up between sample points and lead to distortion during digital-to-analog conversion or lossy format encoding. FabFilter Pro-L 2’s precise true peak metering uses oversampling to show the actual analog peak levels from DACs. Most streaming services suggest keeping true peaks below -1.0 dBTP, which works well for techno masters.
Output gain and dithering considerations
Dithering comes last in my mastering chain. It only happens when we need to reduce bit depth from 24/32-bit to 16-bit for distribution. The process adds low-level noise that masks quantization errors and protects quieter sections from digital artifacts. Multiple dither applications add unnecessary noise and hurt audio quality, so timing matters. Modern algorithms like Triangular or Pow-r shape the noise to make it less noticeable.
Conclusion
This five-step approach delivers professional results for techno productions. I’ve spent years testing countless mastering chains to arrive at this method. The sequence might look simple, but it works wonders by maximizing each plugin’s potential while keeping unwanted artifacts at bay. FabFilter Pro-Q 3 sets up a clean foundation through strategic cutting instead of boosting. Soothe2 then smoothly handles harsh resonances that standard EQ can’t deal with. Saturn 2 adds those vital harmonics that give life to digital productions, and Softube Tape brings that hard-to-get analog cohesion. The combination of Pro-L 2 and Oxford Limiter achieves commercial loudness without losing dynamic punch.
Mastering remains both a technical craft and creative attempt. My most valuable lesson over the years has been about restraint. Small adjustments between 0.5 to 2 dB often work better than aggressive processing. This approach works best with every plugin mentioned. On top of that, mid/side techniques give you precise control that conventional stereo processing can’t match, especially when you need to create space while keeping mono compatibility on club systems.
Some producers might prefer different tools or sequences, and that’s fine. Without doubt, mastering’s beauty lies in this personal touch. This chain offers solid groundwork that adapts to any techno subgenre. These plugins strike a balance between professional quality and reasonable cost. You can achieve studio-grade masters without expensive outboard gear.
Great techno tracks depend more on musical choices than plugin selection. Think of this mastering chain as a flexible guide rather than strict rules. Trust your ears to make final decisions. Here’s my advice: start with subtle settings, check against reference tracks often, and step away regularly to keep a fresh viewpoint. This chain gives you powerful tools – use them wisely to turn good productions into great ones that work on club systems worldwide.