
Music mastering represents the final, significant step that elevates good tracks into professional releases. Many producers still find this process confusing and complex.
Your entire song becomes clear and balanced across all playback systems through mastering, while mixing focuses on creating cohesion between individual tracks. The mastering process typically takes one to four hours per song. Engineers use specialized tools like EQ, compression, and limiting to achieve optimal loudness levels. Many producers face challenges with basic concepts like headroom – the available loudness before reaching target levels. Audio mastering success requires keeping maximum peak levels below -3 to -6 dBFS, with average levels around -18 dBFS.
Let me break down what professional mastering engineers might not tell you upfront. You’ll learn the techniques that matter and understand how to create streaming-ready masters. These masters should hit the sweet spot of -14 LUFS with peaks no higher than -1 dBFS.
Table of Contents
What Is Mastering in Music Production?
Mastering stands as the final creative and technical step in music production. This vital bridge connects your completed mix to the listening world. The process works exclusively with the stereo audio file to put finishing touches on your music and prepare it for distribution on all playback systems.
Mastering vs Mixing: Key Differences
Mixing and mastering serve distinctly different purposes though they use similar tools. Mix engineers work with individual tracks like vocals, drums, and bass to balance and improve each element separately. The mastering engineers, however, work only with the completed stereo mixdown. This basic difference shapes how each process approaches music:
Mix engineers combine separate tracks into a cohesive stereo file and adjust panning, EQ, and reverb to create balance between instruments
Mastering takes that stereo file as a whole and makes subtle adjustments to improve the overall sound
Mixing involves creative decisions about individual sounds, while mastering ensures the entire song works well across different playback systems
The mix happens early in post-production, and mastering provides fresh ears as the final quality checkpoint
A well-mastered album flows smoothly from track to track. Each song maintains similar tonal character with appropriate spacing between them.
Why Mastering Matters for Final Sound
The difference between a good mix and a professional-sounding release lies in mastering. Your music needs to sound consistent everywhere – from earbuds to car stereos to club systems. The process also prepares your music for various distribution formats, each with its own requirements.
Mastering provides essential quality control beyond technical aspects. Engineers look for errors like clicks, pops, or digital distortion that might slip through during mixing. They balance frequency response so no particular range becomes overwhelming.
The process also tackles perceived loudness. Rather than just making tracks louder, it helps them sound appropriately powerful compared to other commercial releases. Streaming platforms now normalize playback volume to around -14 LUFS, so mastering focuses on clarity and translation more than raw volume.
Common Misconceptions About Mastering
Many producers don’t understand what mastering can really do. The biggest myth suggests that mastering can save a poor mix. The truth is that mastering improves what already exists—it can’t fix basic balance problems or poor recording quality. Engineers often say “mastering adds the final polish, it’s not a complete overhaul.”
Some think mastering just makes tracks louder. While competitive loudness matters, mastering does much more: it corrects tonal balance, controls dynamics, and maintains consistency across albums.
The idea that AI mastering can replace human engineers misses the mark. AI lacks critical listening skills and can’t understand context for nuanced decisions. AI mastering tools can’t sequence albums, spot musical errors like clicks and pops, or export in various formats for different distributors.
Modern plugins help many professional mastering engineers achieve excellent results. Expensive analog gear isn’t necessary. Success depends on skill, experience, and a properly treated listening environment.
The best mastering preserves your music’s emotional impact while helping it reach listeners effectively. It’s not about following industry standards—it’s about presenting your unique musical vision in the best possible way.
Step-by-Step Mastering Workflow Explained
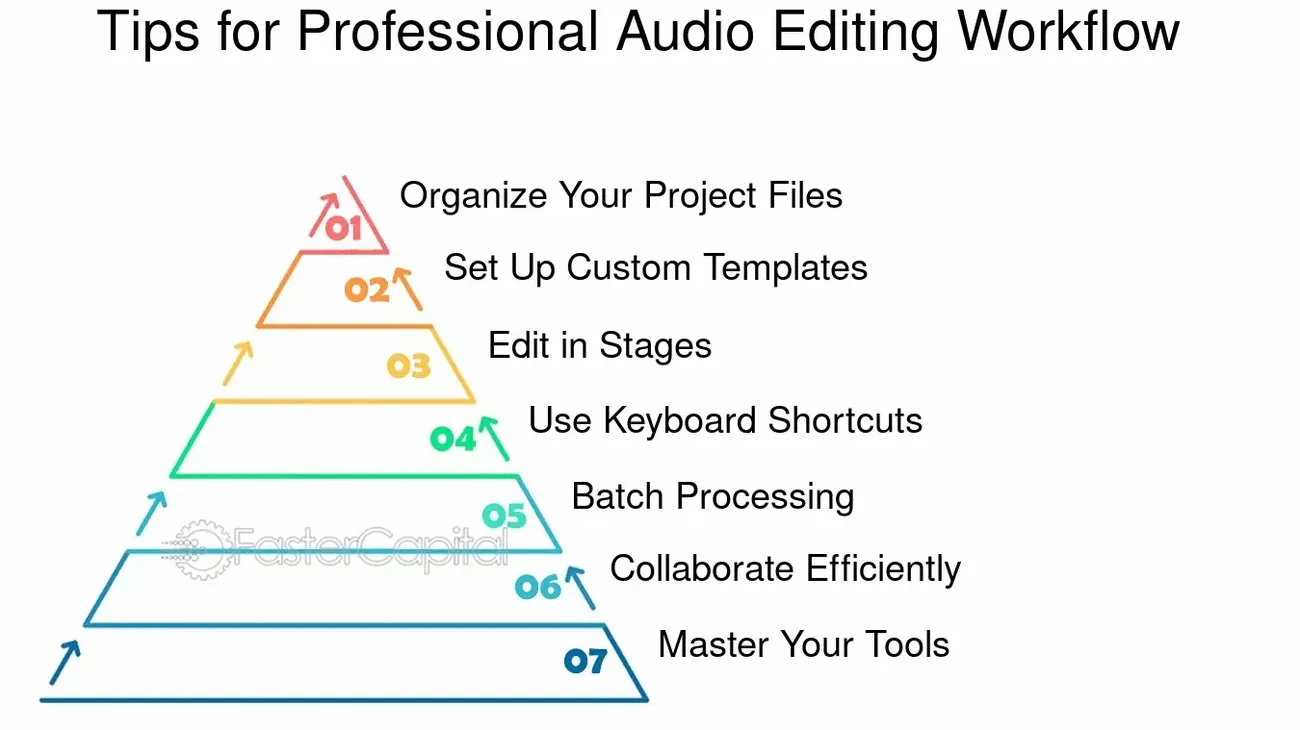
Image Source: FasterCapital
A structured mastering workflow sits behind every polished, professional-sounding track. Mastering isn’t about randomly applying plugins. You need a specific sequence of steps that makes your mix release-ready.
1. Prepare and Bounce Your Final Mix
Your mastering journey starts before you touch a mastering plugin. Your mix should peak between -6dB and -3dB. This headroom is significant because processing will raise overall levels. Without enough headroom, your mix might distort if levels are too high.
You should export your mix at its native resolution. This means if you recorded at 24-bit/48kHz, bounce at those exact settings. Don’t export as lossy formats like MP3 or AAC. These formats will hurt your quality. Add a few seconds of silence at the start and end of your track. This helps mastering engineers analyze noise floors better.
2. Import Reference Tracks and Analyze
Pro mastering engineers start with listening, not processing. Get some well-mastered songs in your genre as reference tracks. These will be your sonic targets. Pick references that match your production’s instrumentation and energy.
Level-matching is a step many people skip. Your unmastered mix will sound quieter than commercial references. This creates a false impression that louder is better. Tools like REFERENCE match levels automatically. Now you can compare frequency balance, dynamics, and stereo image accurately.
The most dynamic sections of both tracks work best for comparison. Choruses usually show the widest frequency range. This analysis shapes all your mastering decisions.
3. Apply Limiting and Set Loudness Targets
Most engineers think about limiting first, though it comes last in the signal chain. Your limiter’s output ceiling should sit between -1.0dB and -0.3dB. This prevents intersample peaks. Streaming platforms need loudness around -14 LUFS. True peaks should never go above -1dBTP.
Today’s limiters come with specialized release curves for different material. IRC settings in tools like Ozone help keep low frequencies intact while managing dynamics at higher levels. Start with 2-3dB of gain reduction. Going harder will crush your dynamics and add distortion.
4. Use EQ to Balance Tonal Spectrum
Mastering EQ is different from mixing EQ. It needs subtle, broader adjustments instead of surgical fixes. Listen to your entire track before touching that EQ. Look for frequency imbalances across all sections.
Mastering typically needs:
Broad Q bandwidths (wide adjustments)
Gentle changes (usually under 4dB)
Bell curves for specific ranges
Shelving for overall tone
Home recordings often build up in the 250-500Hz range. This creates muddiness. Mid/side EQ can adjust stereo width at specific frequencies without changing the whole mix.
5. Add Compression for Glue and Punch
Mastering compression has specific jobs: adding cohesion (“glue”), enhancing punch, or controlling dynamics. Mastering needs lighter compression than mixing. Use ratios between 1.5:1 and 3:1. Keep gain reduction under 3dB.
Serial compression gives cleaner results than one heavy compressor. Attack times need careful adjustment. Fast attacks control transients but might reduce impact. Slower attacks keep that initial punch.
6. Finalize with Stereo Imaging and Dithering
Last touches might need subtle stereo imaging tweaks. Wider stereo can add space, while narrower stereo focuses low-end energy. Next comes dithering when you reduce bit depth, like going from 24-bit to 16-bit for CD. This stops truncation distortion.
Dithering adds low-level noise that randomizes quantization errors. This preserves quiet details during bit-depth reduction. Apply dither once, at final export. Multiple dithering passes stack up noise. Different algorithms (Triangular, Pow-r) shape noise differently to minimize audible hiss.
Hidden Mastering Techniques Pro Engineers Use
Professional mastering engineers use several advanced techniques beyond standard processing chains. These closely guarded secrets help achieve that elusive “pro sound” with challenging material.
Mid/Side EQ for Width Control
Professional mastering engineers prefer mid/side EQ over traditional stereo processing to control space precisely. This technique splits a stereo signal into mid (center) and side (stereo difference) components and allows separate manipulation. The mid channel contains vocals, kick, bass, and snare. The sides hold stereo-panned elements like guitars, keys, and ambient effects.
You can roll off frequencies below 40-60Hz in the side channel to improve stereo width. This centers the bass and creates better focus. A gentle high-shelf boost above 10-12kHz applied to the sides creates high frequencies that wrap around the listener while keeping a solid center image.
Transient/Sustain EQ for Detail Shaping
Transient shaping manipulates attack and decay characteristics of sounds independently from their overall level. This technique lets you adjust the “snap” of a sound without affecting its body, or vice versa.
A flat mix gains punch and definition when you isolate and boost just the initial transients. The sustain portion reshaping controls how sounds “breathe” in the stereo field. Some engineers duplicate the audio and isolate attack portions for precision work. This allows effects like reverb on sustain while keeping transients dry.
Stem EQ and Source Separation
Ozone 12’s Stem EQ marks a breakthrough in mastering technology. It detects vocals, bass, drums, and other elements within a mixed track intelligently. Mastering engineers can make targeted EQ adjustments to individual elements without accessing the original multitrack session.
This technology is a great way to get balance in a problematic mix. You can make surgically precise adjustments to individual elements while preserving the overall mix character when vocals sit too high or drums lack definition.
Unlimiter: Reversing Over-Limited Mixes
The Unlimiter stands as the most revolutionary tool in modern mastering. It “undoes” the effects of heavy limiting. Traditional mastering techniques fall short with already mastered material or over-compressed mixes because the dynamic range has permanent reduction.
Neural network technology trained on thousands of mastered and unmastered tracks powers the Unlimiter to reconstruct flattened transients during limiting. The original recording’s dynamic characteristics come back to life, giving you a fresh starting point for mastering. This tool provides restoration capabilities that were impossible before, making it ideal for remasters, reissues, or fixing problematic mixes.
Mastering Tools That Make a Difference
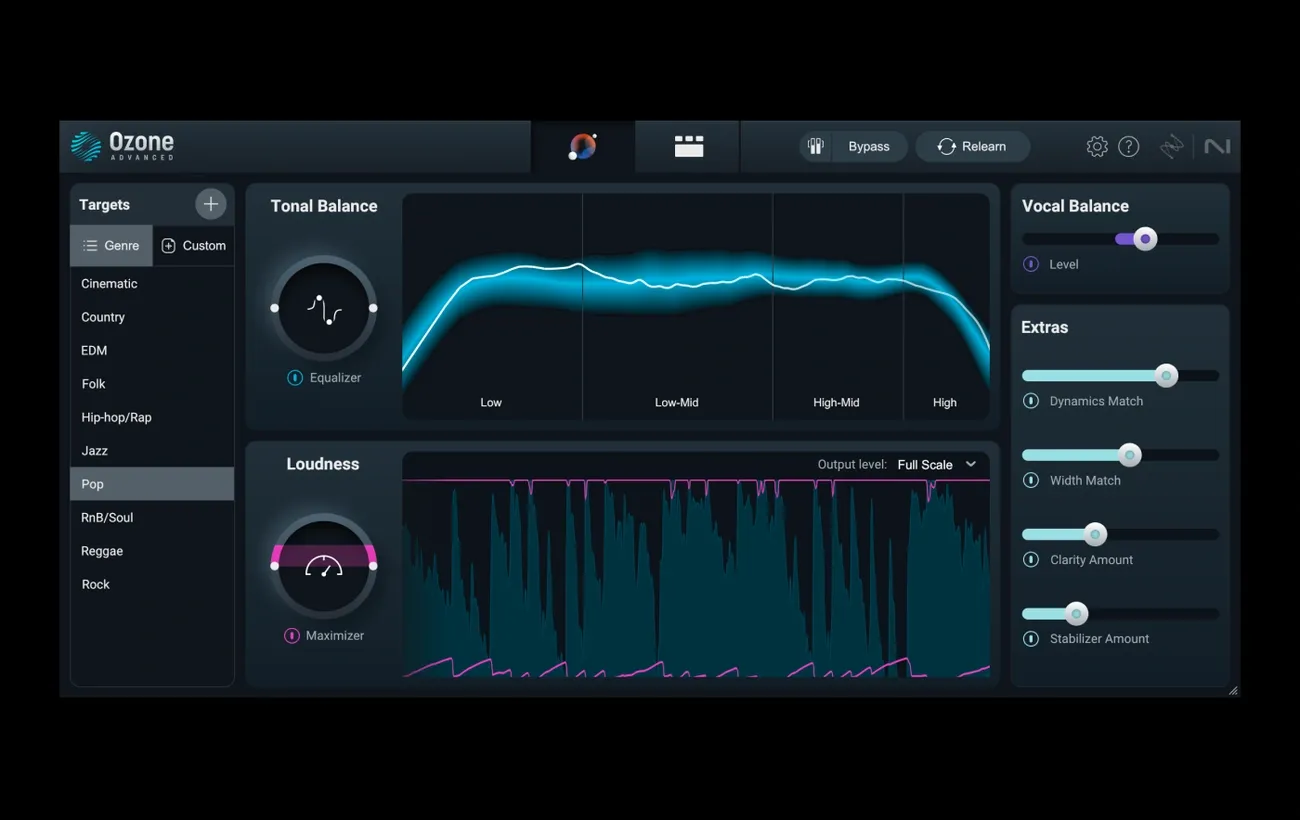
Image Source: Splice
Mastering tools have grown remarkably over time and now offer pinpoint precision to shape your final sound. Modern specialized software can deliver results that were once possible only in high-end studios.
Ozone 12: AI-Powered Mastering Suite
The revamped Master Assistant in Ozone 12 creates custom processing chains by analyzing your tracks. You can select specific processors, target loudness, and pick from 25 genre references before processing begins. The groundbreaking Stem EQ feature splits your mix into vocal, drums, bass and “other” stems. This lets you make targeted EQ adjustments to individual elements without changing the whole mix. The innovative Unlimiter brings back life to heavily compressed mixes by restoring flattened transients.
Tonal Balance Control: Match Genre Targets
Your mix’s spectral information appears against target curves in this visualization tool that helps spot frequency imbalances. The tool offers clear guidance toward professional tonal balance with genre-specific references created from thousands of analyzed masters. You can control EQ and gain parameters directly across multiple iZotope plugins at once.
Audiolens: Real-Time Reference Matching

Audiolens captures sonic characteristics from any streaming platform without downloads or complex routing. The tool combines smoothly with Ozone and fills your target library automatically. This helps you see how your master stacks up against references. The technology reshapes the scene for referencing workflows, as AI-powered assistants can match tone, dynamics, and width profiles from your favorite tracks.
Impact Module: Micro-Dynamics Control
Impact gives you precise control over micro-dynamics through four frequency-specific compressors. Each band can boost punch and dynamic range independently. The envelope timing syncs to musical divisions to create rhythmic pumping effects when you need them.
Real-World Testing: How to Know Your Master Is Ready
Real-life testing proves that your master is successful. Your tools might be cutting-edge, but testing your work in multiple environments remains the best way to check quality.
Check Across Multiple Devices
Sound quality needs testing on different playback systems. Audio engineers suggest you test your mix on at least two or three types of systems. Your car stereo will show problems with low-end clarity and vocal balance quickly. Headphones give you a better view of stereo image details. The most revealing test happens at different volumes, especially at lower levels where balance issues stand out.
Use LUFS and True Peak Meters
You need precise metering in modern mastering. Streaming platforms work best with integrated loudness around -14 LUFS. True peak levels should stay below -1.0 dBTP. Louder masters need at least -2.0 dBTP to avoid distortion after conversion. Tools like LEVELS show you visual feedback that helps make smart choices about loudness, stereo field, and dynamic range.
Avoid Over-Compression and Fatigue
Over-compression kills dynamics and emotional effect. You’ll notice this when the “punch” disappears and waveforms look like rectangular blocks without natural peaks and valleys. Transient details fade away. Regular listeners enjoy the music less when dynamics disappear—even if they can’t explain why.
Mastering for Streaming vs Vinyl
Vinyl mastering differs from digital formats. Vinyl works best with 24-bit masters and minimal limiting. Digital masters can be as loud as you want, but vinyl has physical limits on what the cutting head handles. You’ll need to lower heavily limited masters before vinyl cutting. The good news is that most EQ choices work equally well for both vinyl and digital releases.
Conclusion
So, what is mastering in music really about in 2026? More than loudness or polish, what is mastering in music today is the final step that ensures clarity, balance, and translation across every listening environment. Understanding what is mastering in music allows artists to protect their creative intent while meeting modern technical standards.
When producers truly grasp what is mastering in music, they stop chasing trends and start focusing on consistency, dynamics, and emotional impact. What is mastering in music is not about copying commercial references—it’s about refining your own sound so it stands confidently next to them.
In a streaming-driven world, knowing what is mastering in music means mastering for normalized loudness, preserving dynamics, and delivering a track that feels powerful at any volume. The best results come when artists understand what is mastering in music as a balance between technical precision and musical vision.
Ultimately, what is mastering in music is the bridge between a finished mix and a professional release. When done right, what is mastering in music doesn’t change your song—it elevates it, ensuring your music translates, connects, and endures.tional.